
A very long overdue 'how to guide' post here today looking at the step by step process of installing one of our Signature Series 4 way Telecaster wiring harnesses along with a fresh set of pickups! The 4 way harness takes your traditional 3 pickup positions of neck only, neck and bridge parallel and bridge only, but adds a 4th position where the neck and bridge are in series providing a beefier tone. It requires a little more work than a standard 3 way, but the results are great!
Telecasters are an iconic modular design, making them very easy to work on, but I hope this guide helps you during your harness install if it is a new task to you. Here I will break down each and every step during the install process including removing the original wiring and installing your new harness. For this example, I will also be installing a new set of McNelly T-Bar pickups, with the neck pickup already modified for 4 way switching. I have written an article about modifying your Telecaster neck pickup to make it suitable for 4 way switching, and that article can be read HERE.
This step-by-step guide features the traditional method/style, so please bare this in mind. 
Let's start off with what tools you will require. I will also list below it some additional items that could be required depending on your guitar's original specs. Some far east made Tele type guitars for example may have pots with a smaller shaft diameter, in those cases you may choose to replace the control plate with a US spec item that would suit the new CTS pots, or you may choose to modify the existing plate. The CTS pots used in my wiring harnesses have a 9.5mm diameter threaded shaft, so you will need holes in your control plate that will accommodate for that. If you are choosing to widen the holes in your original plate, then I recommend doing this with a step cutter drill bit. If at all unsure about drilling the original plate, then a new US spec control plate may be the easiest option for you too. With that said, here are a list of recommended tools to have at hand during this install!
- 40w minimum Soldering iron
- Lead free solder (I personally use Rapid 22SWG Lead-free 0.7mm diameter solder)
- Cross head screwdriver
- Small flat head screwdriver
- Wire cutters
- Wire Strippers
- Small nose pliers
- 13mm socket
- Cloth or similar to protect body/paint finish
- Wiring diagram to follow, this will depend on which 4-way switching method you have chosen, as I make my 4-way harness kit with two different styles. Traditional, and updated. The differences comes down to where you want each pickup/series/parallel position on the switch.
Traditional/Standard Fender 4-way switching diagram - HERE
'Updated' alternative 4-way switching diagram here - HERE
Make sure you follow the wiring diagram to suit/match the 4-way kit spec you have purchased, as they are different in their wiring/install method.
This step-by-step guide features the traditional method/style, so please bare this in mind.
Additional tools that could be required depending on your guitars original specs
- Step cutter and drill
- If replacing or adding a bridge ground wire, a length of 22AWG wire
1) Onward with the install. Before the soldering iron is on, we'll want to strip the hardware and components no longer required from the guitar.
As I'm swapping pickups at the same time as this install, I decided it would be easier to carry out all of this work with the strings removed. I haven't shown that stage but I'm sure you won't mind me not showing photos of removing old strings!
This is a simple task of grabbing your cross head screwdriver and removing the two small mounting screws at either end of the control plate.
Helpful tip, have a small tub to hand so when you remove any screws etc you can keep them safely stored until required again.
2) We can now lift out the harness complete on it's control plate, and this is the first chance to see what original components we're working with. This Mexican built Telecaster has fairly high quality components already in there from the factory, some lower spec CTS pots and an Oak switch most notably. It does look like a whole bunch of spaghetti with the extra wire though! Will be nice to tidy that up a little in the process of the new install.
3) Next up I'll be removing the jack socket, which on this particular guitar is held in place by a traditional Telecaster cup mount. To remove the jack, simply grab your socket and loosen the securing nut.
4) With that loosened, you will then be able to simply pull the jack through the jack cavity into the main control cavity as shown in the image below. 
5) Now I move my attention to removing the various pickup and ground wires soldered to the pickup selector switch and pot casing. First up, I'll be removing the 'hot' connection pickup wires which are attached to two lugs on the switch. On this guitar, the neck pickup and bridge pickup have different coloured 'hot' leads which makes identifying them that little bit easier. Rather than un solder them from the lug, I simply chose to snip the wire. I personally find this a little less fiddly to do, but you can do either depending on your preference.
At this stage I will also mention that on this particular Telecaster, the pickup wires enter the main control cavity via two different access holes, so again this does make identifying which pickup wire is which a little easier. Some Telecasters have both pickup wires entering the control cavity via one access hole so it could look ever so slightly different to my images here but the general approach is the same.
I then also remove both of the pickup ground wires which are usually found soldered to the back of the volume pot casing. Again, you can heat the existing solder joint and remove them, but on this occasion I simply snipped the wires at the joint as I'll be tidying all of that up on the new harness install anyway.
6) Removing those wires will now mean you can lift out the old wiring harness and control plate completely from the guitar body. At this stage, it is the simple task of removing the old wiring from the hardware and installing the hardware onto the new harness. Again, I'll point back to something I mentioned in the opening paragraph. We are lucky on this occasion to be working on a Tele which already had CTS pots with a 9.5mm pot shaft thread diameter meaning I don't need a new control plate or don't need to widen the pot holes to accommodate the new harness. But if you do need to widen the pot holes, this is the stage where you'll need to do this, and I would recommend doing so by covering the plate in a masking tape or similar to protect the plates finish then by using a step cutter drill bit, widen the hole to accommodate the 9.5mm CTS pot shafts.


As you can see from the above photos, you'll require your small flat head screwdriver to remove the control knobs providing they are the traditionally used grub screw fixing type. Then your socket to remove the securing nuts, and finally a cross head screwdriver to remove the switch from the plate. The switch tip should just pull away with ease. 


In this series of photos, I simply show the process of mounting the new harness to the old hardware. Just a reverse sequence of what is explained previously. I will add however, that I personally recommend keeping hold of your wooden mounting board that I supply my harnesses mounted to for shipping, as you can mount your old parts to that board for safe keeping! Much better than just throwing it away.
7) At this stage, I'll also remove the original pickups. Whether you are installing new pickups or keeping your original pickups, you will still need to remove your neck pickup to modify it for 4 way switching. For this you need to add a separate ground wire from the neck pickup cover. I have written an article on that already, which you can read HERE. Depending on what type of pickguard your Telecaster has, some neck pickups have the adjustment screws visible and some they are underneath the pickguard. Either way, remove your pickguard and unscrew the neck pickup ready to carry out the cover ground wire modification mentioned in the link in this paragraph.
Moving on to the bridge pickup, these are usually mounted to the bridge plate. As this particular Tele had 6 individual bridge saddles, it was difficult to access the mounting screws for the bridge. So for ease of access, and also to show it clearly for these photos, I decided to remove the saddles too. 

With the bridge mounting screws removed, I was able to lift the bridge assembly off the guitar and check out the original pickup. The original bridge pickup doesn't have a baseplate, so you may see in the photo that it has an additional ground wire running from under one of the mounting screws for the pickup.
Similarly, below is a photo of the new McNelly T-Bar pickup, which also doesn't have a baseplate sat alongside a more traditional vintage spec Telecaster pickup showing what a baseplate would look like.
So, why don't you need an additional bridge ground wire if your pickup has a baseplate? Basically when you attach the pickup to the bridge, the pickup mounting screws act as a ground contact between the bridge plate and the pickup. When a bridge pickup doesn't have a baseplate, your bridge isn't ground so you simply need to add a separate wire to ensure your guitar works correctly and doesn't have unnecessary buzz/hum.
I then mount my new pickup to the bridge and look at installing my new bridge ground wire.
8) Here I require a length of wire to use as my bridge ground. For this I use the same grade wire as I used on the harness itself, which on this example is Gavitt 22AWG cloth covered wire. I feed it through the wire access hole and into the main control cavity.

Then when that is fed through, I cut to the required length, push back some of the cloth shielding to expose the central core. Simply bend a length of central core over the body edge, and then you can re-fit your bridge and bridge pickup assembly as pictured below. Feeding the bridge pickup hot and ground wires through the access hole to the control cavity in the process.

As I needed to remove my saddles to access the mounting screws, I then re-fit my saddles at this stage too.
9) Back to our modded neck pickup! So with the cover ground wire now added, it's ready to re-install the neck pickup to the body. Place the neck pickup into the cavity, and feed through your three pickup wires into the main control cavity.

10) With that done, we can look at getting this all soldered! So the harness (all now mounted to the control plate hardware) rejoins the fun, and we can begin preparing the wires for soldering.
I start things off with the bridge ground wire. As we have a few ground solder joints to make, it's worth being tactical on your positioning so you leave yourself plenty of working space (if you're planning to attach all the grounds to the volume pot casing that is, but you can of course make use of the casing real estate also on the tone pot too!).
11) Next up is wiring in your bridge pickup, so using your 4 way wiring diagram, locate the correct lug on the switch for your hot bridge pickup wire and make your solder joint.
When complete, move onto your bridge pickup ground connection, again on the back of a pot casing.
12) Moving on to your neck pickup connections. I'll start with the hot wire firstly, so again using your 4 way wiring diagram, locate the correct switch lug and make your solder connection.
for the 4 way schematic, your neck pickup ground wire also goes to the switch. Refer to your wiring diagram, locate the correct lug and make your solder connection.
We've now reached the final solder joint of the install! This is the neck pickup cover ground wire, and this simply goes to the back of a pot casing.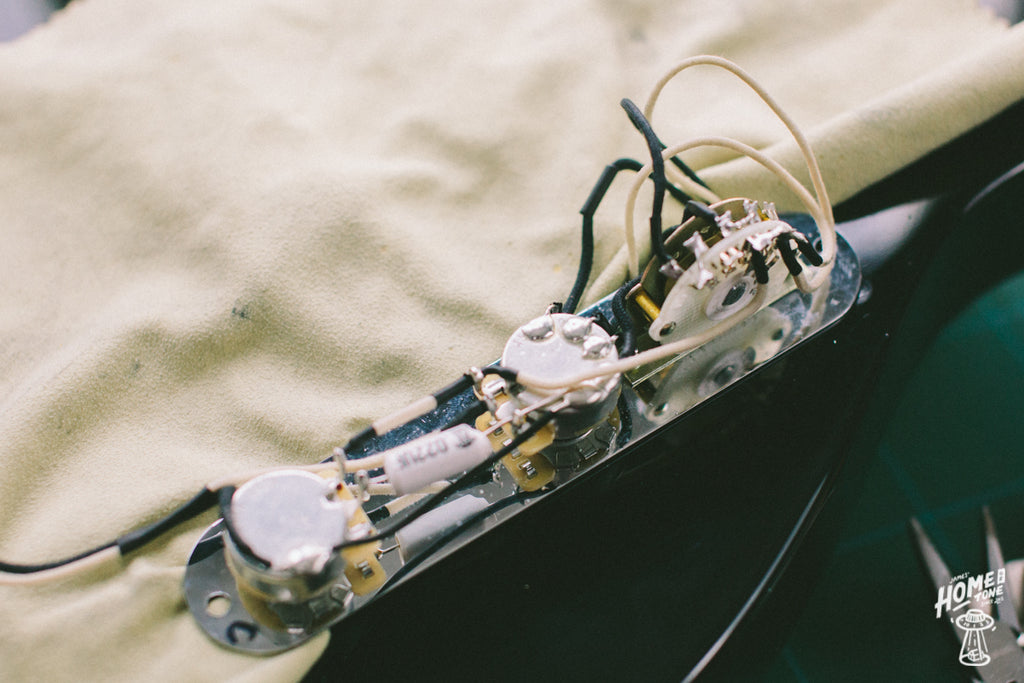
Guitar pots are susceptible to excessive heat, so with all of these ground connections be sure to take care with too much heat from your soldering iron for prolonged periods of time. If you've flown through the soldering stage, perhaps just give the casing chance to cool before doing your ground connections. Patience is key with any type of guitar repair or modification.
13) With the soldering complete, I now install the jack socket. So I feed the jack and jack wires into the cavity and through to the jack mounting cup. Simply mount that securely with your socket and tighten.
14) You're ready to test! As I don't have strings on this guitar yet, I prefer to 'tap test' the guitar first to save wasting any time installing strings only to find out things have to be taken apart again if there happens to be an issue. To tap test, I just plug the guitar in without any strings on, and gently tap the pickup in the relevant pickup selector switch positions and check the functionality. If all as expected, string it up and give it a whirl!
15 ) Setting pickup heights will likely be your next task, for this I go to my trusty standard specs of fretting the string at the highest fret, and measuring from the bottom of the string to the top of the pole piece. My go-to measurements to start with are about 2.4mm on the bass side and about 2mm on the treble side on both neck and bridge pickups. Then refine from there depending on personal preference or overall pickup output balance, I mainly just look for a nice balance of volume between the two. Tweak to your hearts content here, you will be surprised what a difference pickup height can make and this really is personal preference I think.
There we have it! Your Telecaster is now kitted out with 4 Way switching and should be more versatile than standard with it's additional 'series' position without losing any of those sounds that make a tele, a tele! Although the 4 way install isn't quite as simple as the Tele 3 way wiring install, I think it is still one of the easiest to carry out, and that ultimately is down to Leo Fender's genius modular design of the Telecaster. I really hope this helps with your own install if it's a task you've not carried out before. Upgrading your old wiring harness can offer great results, particularly if the original components are of low quality. It can bring out the best in your pickups, or allow for more usable controls when playing for a more expressive experience particularly in the case of 4 way wiring due to the additional position.
Thanks again for choosing one of my wiring harness for your Telecaster, and I hope this article helps your install go as smoothly as possible! I'll soon also be posting a 4-way wiring harness install which will also include how to install new pickups at the same time.
You can find the range of 'Signature Series' wiring harnesses on the shop by clicking HERE
You can find the range of wiring diagrams and info guides to follow during the install by checking out the main website banner above, and clicking on the drop down menu named 'Wiring Diagrams and info'
James
