This article has been one of my most viewed/read on my blog, so a quick thank you to everyone who has visited the website via this post. I thought it was good time to update a few outdated points discussed in this post (that was originally written 8 years ago to this point!) so hopefully it continues to be relevant to readers looking at the subject. There are now even more options available in the market today, safe to say we're now well and truly spoilt for choice for quality upgrades/replacement solutions to the offset bridge/vibrato quirks. Each of which have their benefits, I unfortunately haven't had the pleasure of testing out every new variant on the market so please forgive those that aren't featured. If I ever get the chance to do so, I'll be sure to include them in this article. But for now, these are the few I have had solid experience working with and feel I can share some thoughts on those as a result. 
When it comes to offsets, Jazzmasters & Jaguars in particular, one topic is almost always the the first to be uttered, their bridges. With forums and social media discussions seemingly full of tales of string jumping and buzzing woes, quick fixes and upgrade options. As a result of this, I wanted to feature some of the most commonly seen bridge solutoins and share my own experiences of them, (and do so honestly with you too). Full disclosure, since first publishing this article many years back, I am now an authorised dealer for one of the brands/products discussed but will approach discussion on all of them as equally and respectfully as I would should I not be a dealer. I owe that to the reader first and foremost. I am a big fan of these instruments, and do feel each of these alternative bridge/vibrato solutions do indeed have their unique benefits. You'll can find online that most offset players will be incredibly loyal to their chosen solution, being quick to recommend their choice and but sadly too, equally as quick to discredit the others, so I'll do my best to leave that aside and discuss each equally, the best I can. So this may become a handy reference point for those getting into these superb but often misunderstood guitars. 
If you look at a handful of the most iconic guitars Fender & Gibson put out there as an example, like the Stratocaster, Les Paul and ES-335 perhaps, the factory fitted bridges offer most guitar players exactly what they need with no immediate reason to look for alternative part replacements. But for the Jazzmaster & Jaguar this is often a very different story, with it's original design bridge leaving modern day players frustrated and on a mission to get the best from their guitar. A well set-up and working JM or Jag is one of the most enjoyable, versatile & inspiring guitar designs to play from any maker to date, keeping it's flame well and truly alive despite it's little quirks. From it's initial intention to be a solid body Jazz instrument, to a renowned 'Surf' Sound guitar, to an Indie icon and noise rock/shoegazer mainstay and beyond, it's impossible to disregard these superb instruments just because of a troublesome (to some) bridge design.
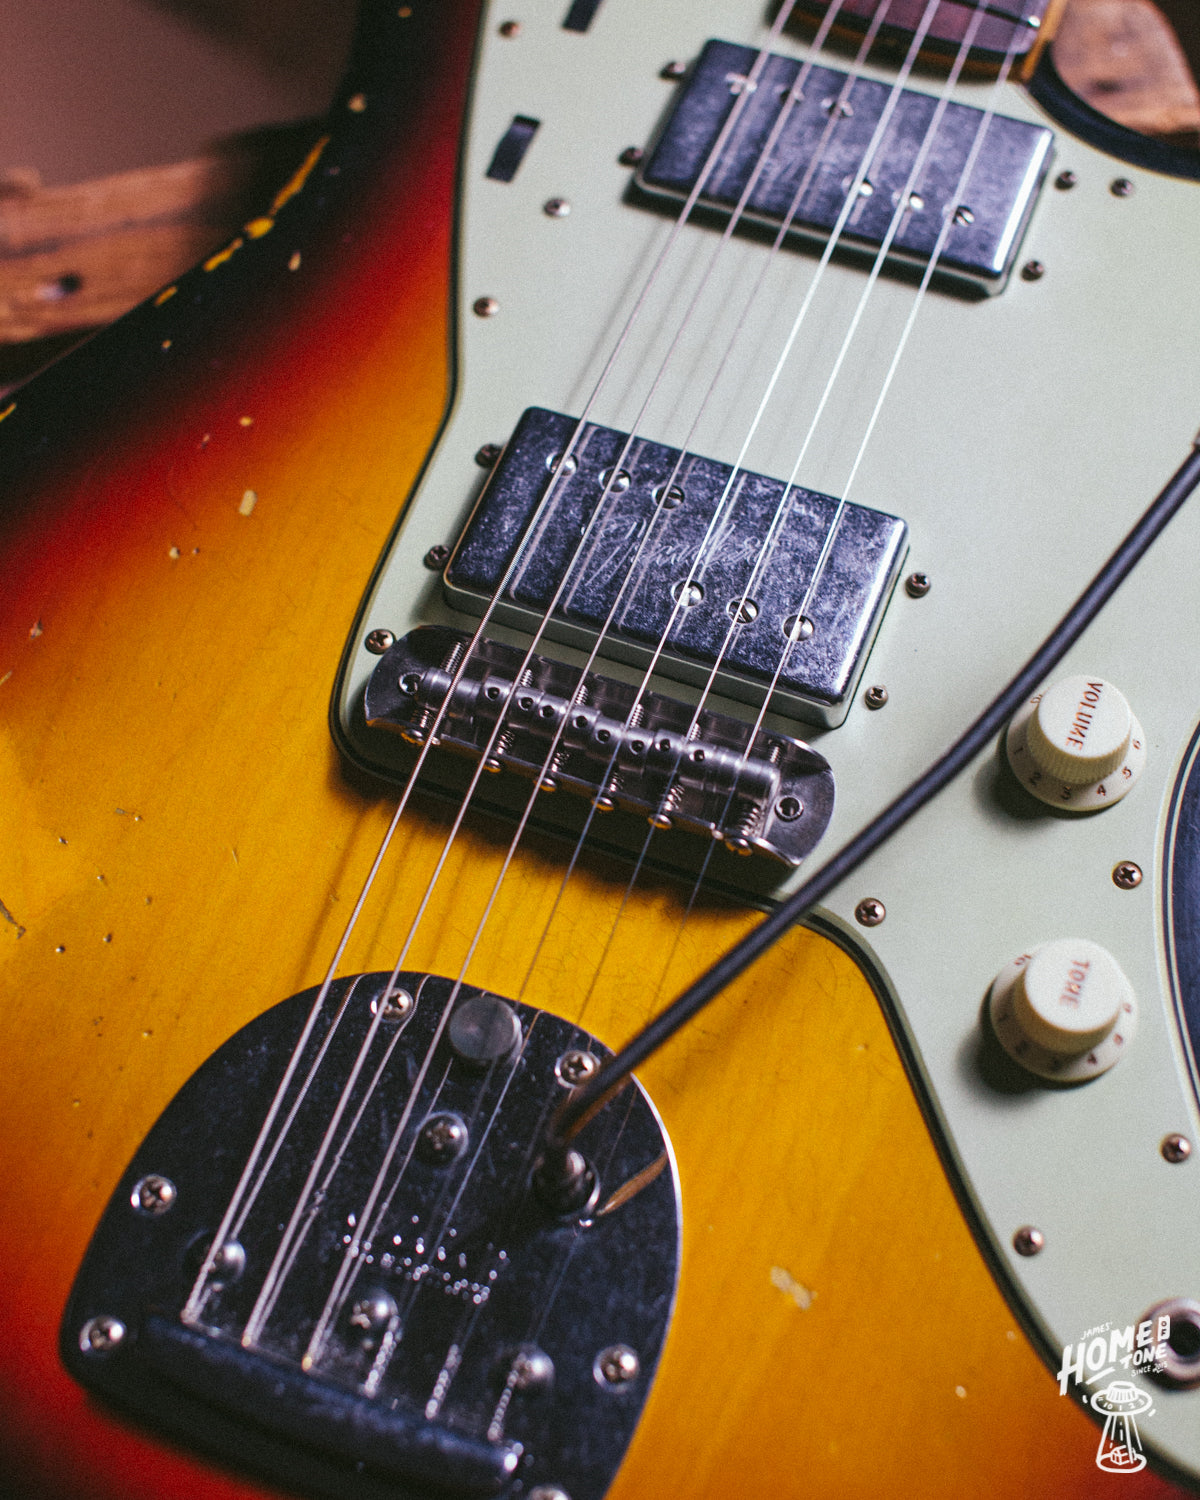
So, why bother with the guitar in the first place if the bridge is 'rubbish' and what is it that people find wrong with them then?! If you're familiar with these guitars you'll know all too well already, but if you're new to offsets it's down to a few simple things. The problems often found by modern day players with the original design bridge are the strings jumping around the saddles, as demonstrated funnily above, by the one and only PT (haha I love this photo). Each individual saddle is made with lots of small, shallow 'notches' or grooves, which were intended to keep the string in place. Much like how the early Telecaster bridge saddles were also designed to do. But unlike the Telecaster, the JM & Jag doesn't have the same string break angle over the saddles meaning the string tension alone often isn't enough to keep the strings seated on their saddle effectively. Back in the 50s when we first saw this specific bridge used on the introduction of the Jazzmaster, it likely wasn't as much of an issue, if an issue at all. This is primarily because of the strings most commonly used at the time (as well as what Leo intended the Jazzmaster to be too), thicker 12 gauge, flat wound strings providing much more tension over the bridge than what modern day players will likely be using. With lighter gauge strings many players report that with even the most modest of a strum will see the strings jumping across the saddle and instantly spoiling your fun.
There are a number of ways of resolving this, which don't all lead straight to spending more money & replacing the bridge. Speak to any offset player and the general rule is to use heavier gauge strings, and there's good reason for that. Switching to a heavier gauge like a set of 11s or 12s for example quite simply increases the string tension, which in turn affects the tension over the bridge. For some players this is enough to fix their problem. The standard bridge in terms of functionality/design is, on paper, well design with it's individual saddle height and intonation adjustment helping setup accuracy, and perhaps even it's unique 'rocking' design which tilts back and forth when the vibrato arm is used. So if simply upping a few gauges of string is worth trying first, then I say go for it! When I first collected my Jazzmaster, it had 9s on it and it was a real mess. If that's how they're set-up or left on the hangers at many shops around the world, then it's hardly surprising why a lot of players don't even give them the time of day. You'll be surprised at how great an 11 gauge set feels on a JM, even if you're not usually an 11 player. Due to the shallow break angle and seemingly never ending gap between tailpiece and bridge, the tension is unique on these guitars. A heavier gauge just seems to work for the guitar and feels very well balanced. Particularly if it's a Jaguar too, as the shorter 24" scale really benefits from a higher gauge like 11-52s or 12s for example.
Another complaint some players have are the adjustment screws 'creeping' or working their way loose. This can lead to saddle height/radius changing, or even the overall bridge height adjustment grub screws moving and effect string height. This is something I noticed pretty quickly with my JM when I stuck with the standard bridge for a while too. This is an easy fix and costs a couple of quid, as all you really need is some thread-lock. Remove the bridge and strip it down, clean it up to ensure all the threads are free from grit/dirt etc, then before re-assembling simply apply a small dab of thread-lock to each of the grub screws. When you perform your set-up and get everything adjusted and dialed in to your tastes, this simple maintenance fix should keep it all from moving for a good while. The point I'm getting at here, is you don't neccesarily HAVE to go out and spend more money on another bridge the moment you buy an offset guitar. It's worth trying a few simple things first, and if then it still doesn't achieve the reliability you need, then thankfully the market is well and truly bursting with some superb bridge options to simplify the process. 
Mustang Bridge The Mustang bridge mod is one of the more affordable options available. These are named the Mustang bridge, because it was came as standard on production Mustang guitars, but thanks to the similarities in it's baseplate and post design they can be used on Jazzmasters and Jaguars too. But there are caveats to this, we'll get onto that in a moment.
These featured barrel shaped saddles and feature a more prominent single grove in each saddle for the string to seat more effectively. They only offer intonation adjustment because the barrels are made up of 3 pairs to replicate the string radius, again if referring to the factory design, usually set at 7.25" radius. This means really is a great lower cost option if you have a vintage radius Jazzmaster or Jaguar, but if you have a 9.5", 10" or 12" radius guitar then sadly this particular option isn't so effective for you. They feature a 55.56mm (standard Fender mustang that is) string spacing, so although this is similar to the traditional JM/Jag bridge, for some players this may push the outer strings too close to the edge of the fingerboard to be viable for you.
As standard, the Mustang bridge will continue to ultilise the 'rocking' or tilting bridge design also seen with the traditional Jag/JM bridge. So if you are okay with that feature, you'll be okay here too.
Although there are single string grooves in each saddle, I still feel a sufficient height and tension are beneficial for stability, though. So setup balance is still something that'll require attention.
You can usually source these as a genuine Fender replacement full bridge pretty easily these days, but they are also readily available as just replacement saddles, like those by AllParts for example, which can be easily swapped into your guitars existing bridge hardware easily if desired. The Mustang style bridge has be adopted and further refined/developed by a number of other companies in more recent years, so there is certainly merit in these barrel saddles.
Overall these saddles certainly serve their purpose, and do so very cost effectively. A non invasive modification, easy to fit, helps reduce strings jumping out of the saddles and look quite pleasing if that's something that is important to you too. If you have a 7.25" radius fingerboard Jag or JM, want to get rid of your traditional notched saddle bridge and do so in a little more wallet friendly way, then the Mustang replacement bridge would be worthy of your consideration. If you like the idea of these saddles, are open to spending a little bit more, then read below for some companies that have further improved the design.
Genuine Fender replacement Mustang bridge assembly - £49.99 at the time of publishing article
Stay Trem
British made and designed, the Stay Trem bridge is an incredibly popular choice worldwide, and for good reason (although it is worth noting StayTrem have drastically cut down their production in recent years, so that combined with their huge demand mean these can be a little tricky to source in a hurry, so plan ahead I say :) ). Notably used by many famous offset players, Johnny Marr for example being one of them who has long been an advocate of the bridge.
With it's baseplate, posts and saddles all being machined from Stainless steel, and a few choice modifications over a mustang bridge mod, this bridge is not only more functional due to it's precision engineering, but a great audible modification also. This bridge isn't just another take on the Mustang bridge though, it tackles a few other niggles found by offset players too. As mentioned earlier, some find that the original bridge height adjustment screws found deep in those two post holes can sink downwards over time due to vibration and/or string tension, meaning your nicely set action keeps creeping lower down. Again, this can be quickly fixed by applying some thread lock to the adjustment screw threads, but Stay Trem have developed for their bridge two nice nylon bushes that sit at the bottom of the posts. This means the adjustment screws, once adjusted, sit there firmly. Simple, but clever, huh! Also, some players reported rattles caused by the intonation adjustment springs on each saddle, an annoying little detail that can be quite frustrating when recording perhaps or if you've got a fine tuned ear to that kind of noise. But here, each saddle adjustment screw is held firmly in place with a circlip (from memory earlier Staytrem bridges used to have nylon bushes for this feature but newer versions I have worked on appear to have circlips. No spring in sight, making it nice and solid, and importantly, accurate for intonation. Speaking of intonation, the intonation adjustment screws are now also slightly offset from the string, making access to them for adjustment that little bit easier.
The saddles themselves are based upon the Mustang equivalents, with a barrel design and single string slot per barrel. But this time precision machined from Stainless Steel instead so a much nicer quality material aiding tone among other things. The saddles themselves are a touch wider so they sit flush against each other and to the correct string spacing, but despite that extra width of the saddles, the string spacing is at a more JM/Jag suitable 52mm instead. They're available for both vintage 7.25" radius and more modern 9.5" radius guitars. Oh, and if you have a mute on your Jaguar still, you can continue to use it with this design.
These continue on with the traditional rocking/tilting design. Height adjustment here is only done via the post adjustment screws, as all saddles are to a fixed height/radius. Tonally, the stainless steel is nice and resonant, as well as harmonically pleasing.
Overall, I think the Stay Trem is a superbly made, really great value (for us in the UK anyway) with some nicely thought out revisions to the Mustang template to better suit the Jazzmaster & Jaguar. There's good reason it's the main choice
Stay Trem Bridge - £75 (at the time of article)

Mastery Bridge
I think it's safe to say, that nowadays if the topic of Jazzmasters and Jaguars comes up, it isn't long before the words 'Mastery Bridge' join in on the conversation. Designed, developed and made in the USA, and played by a wealth of musicians like Elvis Costello, Kurt Vile, Nels Cline and Thurston Moore for example, all famous of course for their offset ownership.
Mastery is a complete drop in replacement bridge with quite a few changes over the conventional, traditional bridge. Probably most noticeable is the Tele-esq saddle design. There are two saddles on the bridge, with two intonation screws per saddle (4 total) which essentially pivots the saddle to achieve intonation adjustment. As these are fully adjustable saddles, you will be able to use this bridge with any radius fingerboard, but will ideally require you needing a set or radius gauges to accurately do so. This adjustment is done by smaller grub screws at either end of each saddle. String spacing here is a tighter than traditional, 52mm. As with all offset bridge types, string height/action adjustment is made by the posts. Whilst we're on the subject of the posts, here is the first example of a different approach to an offset bridge. This is not a rocking/tilting design. The mastery bridge posts have been designed to be a tight fit into the existing thimbles, and will be static once installed. Many players prefer this, providing better stability, reliability, sustain and more. The string notches on these are much, much deeper meaning it certainly eradicates the worry of strings slipping out of the saddles, no matter how hard you play, improving the playing feel drastically. I will say from experience of installing, setting up and playing many guitars equipped with Mastery bridges, that I still think they benefit from a good string break angle over the saddles. I think these much deeper string slots, if paired with a particularly shallow string angle can result in a little unwanted lateral movement within the saddle slot. If this sounds familiar, increase the heel angle, get your bridge set a little higher and it will spring to life I find and perform superbly well.
Another different material here too, with Mastery opting for solid brass construction with a super hardy and self lubricating chrome plating. Brass is probably most commonly seen on Tele bridge saddles, being the material of choice on vintage and modern models alike. The sound is warm yet vibrant retaining the chimey nature of an offset Fender. Many players note a difference in tone after fitting a Mastery, whether that change in tone is right or wrong for you is up to you to decide, but the difference is entirely understandable switching to a different saddle material and fixed post style.
The reason why a coating is used instead of bare brass, is that brass is very prone to wearing, particularly with vibrato use. So this coating helps protect the saddle from wear, and looks rather neat too I think.
These 'out the box' will not allow for Jag players to retain your mute, but as you can see in my example photo above, you certainly can retrofit one though with some minor modifications to your mute plate. General installation, I think, isn't quite as straightforward as a Mustang or Staytrem bridge, there are more adjustments to be made so perhaps if you're not equipped to do this, hand it over to your trusted local tech. But if you have some good setup tools and some confidence in making multiple adjustments to a bridge accurately, then get stuck in I say!
Overall the Mastery Bridge is widely seen as the go to 'premium' bridge option alongside the Stay Trem, with many in agreement that the design is incredibly functional, and some only disliking it because of it's aesthetics and finish. Which is a totally personal choice so it's each to their own. If you're in the market for a well made, well designed bridge, the Mastery has to be a major consideration.
Mastery M1 Bridge - £190 at the time of publishing article
The Descendant Companion Bridge
A fairly recent addition to the offset scene, is Chris Swope's Descendant Vibrato, and shortly thereafter, his 'Companion bridge'.
Chris introduced his Vibrato unit first which in itself set to help conquer a few of the offset bridge niggles, notably by looking to resolve shall string break angle over the bridge. So in theory, his Vibrato could actually help solve some of your traditional bridge complaints! But not too long after introducing his Vibrato design, he introduced the Companion Bridge which really set out to defeat offset bridge woes once and for all. A number of the features for the Companion Bridge were ultimately design with the Descendant Vibrato in mind, which is certainly understandable seeing as both are his creations. But the Companion Bridge will certainly still act as a standalone replacement and doesn't have to be fitted alongside a new Vibrato unit too. Much like the Mastery, this bridge really does set out to be as adjustable as possible, but I do think there are one or two details additional here that make the CB a phenominal bit of kit.
Aesthetically, you'll see a return of barrel style saddles which if you do perhaps prefer that look, may be pleased by this. This time though we have two outer 'fixed' barrel saddles, whilst the middle 4 are height adjustable allowing for the bridge to be set to any radius you wish. Again, this means it isn't quite the quick drop-in replacement like a Staytrem or Mustang bridge, and will require a little more tech know how (and tools) to get the best from the installation. Sticking to six individual saddles though, rather than the mastery's two, you have full intonation adjustment of each saddle here, with an ever so slightly longer adjustment area too over a traditional, staytrem or mustang bridge which might prove useful during a tricky setup. The baseplate is nice and shallow as to not come into contact with the strings as they pass behind and to the vibrato (particularly useful if using alongside the increase break angle Descendant Vibrato unit) with additional recesses on the outer strings to further this clearance. The entire assembly is precision made with weighty stainless steel. The saddles are tightly pressed up against one another for stability and reduced lateral movement of the saddles. String spacing here is 53.97mm (2 & 1/8"), so not as broad as a traditional bridge so reduces the risk of strings sitting too close to the edge of the board, but not too tight together either.
Overall height adjustment is still done via the outer posts, but the posts I think are where this bridge really does shine. These can be fitted in a traditional rocking/tilting style like the originals should you wish, but you can also ultilise it's post collars to have a 'fixed' non rocking bridge too. So furthering adjustability and user preference. But the fixed posts are actually slightly offset, and from a guitar tech point of view, this feature is superb. This can help resolve any niggling neck alignment issues the guitar may potentially have. So if you have found prior bridges have resulted in your strings sitting slightly closer to one side of the fingerboard edge than the other, then with these offset posts you can adjust and position them in such a way that it will slightly reposition/realign the bridge location and help correct that alignment. Super helpful from a setup/refinment perspective I think and something I have found beneficial when working on customer instruments here in the workshop.
Lots of adjustability, and really pushing where you can take a Mustang style bridge design. It sounds great, despite it's stainless steel finish manages to capture some of the traditional looks and would be a great addition to any offset providing it is within your budget.
£215 at the time of publishing article
Tune-O-Matic
I'm closing in on the couple of more controversial bridge options for offsets now, with one that was really commonly seen in the 80s and 90s on offsets in particular, the Tune-O-Matic. The TOM in terms of production guitars is perhaps most commonly seen on Gibson models, but has found home of a number of factory Fender offsets over the years too. As a result, you may well be starting your offset journey with one of these already fitted, but this may not neccesarily be a bad thing, I promise.
If your offset is one of these models that features a TOM from the factory, and are experiencing some issues with it, then I will touch on a few things you can do to help. But you might also be considering modding yours to be equipped with one as opposed to a traditional design, so let's also touch on whether that's viable too.
The main reason you would see many players having techs retrofit these bridges to their offsets back in the 80s and 90s for example was simply that there weren't really any other viable options. In this period countless players were reaching for offsets because they were far more affordable than the likes of a Strat, Tele or Les Paul. The market demand wasn't there, and musicians on a shoe string budget were snapping them up thanks to that lull. So we began to see bands equipped with these guitars, much like in the 60s! Only this time, surf guitar and 60s pop music was not the music of choice, it was Indie rock, shoegaze and early grunge to name a few. Very different playing and approach, which as a result meant players were quickly noticing niggling issues and un-reliability with the traditional bridges seeing more and more players handing the instruments over to techs and having them fit anything that would help. More often than not, this would be a Tune-o-matic. Perhaps due to them being so readily available, but perhaps also because the saddles were/could be easily notched for secure string capture aiding reliability during heavy use.
Thanks to iconic players from this period, such as Thurston Moore of Sonic Youth, J Mascis of Dinosaur Jr and perhaps even Kurt Cobain of Nirvana, jumping forward in time, Fender began equipped new production offsets with TOMs too. Sometimes this was executed really well with compatible TOM specs, but sometimes not. I say this because traditionally TOM bridges come with saddles shaped and notched for 12" radius fingerboards, understably so due to their affiliation with use on Gibson instruments. But have a 12" radius bridge on an offset with a 7.25" or 9.5" radius fingerboard and you will encounter issues with setup/playability unfortunately. Why is this an issue you ask? Well if you have a particularly flat radius 12" bridge fitted to a particularly curved 7.25" or 9.5" fingerboard you will inevitably find inconsistency in your action or some form of compromise in action at one side of the fingerboard to the other, or the middle of the board too. Set your action nice and low on the treble side of the board to find the action even lower in the middle and super high at the bass side, or vice versa. As the conflicting radius pass one another, but we simply cannot state that this is always the case though. I have encountered many production Fender models with 9.5" saddle radius TOMs installed, such as certain production runs of the Squier J Mascis signature, Classic Player, and the MIJ Fender J Mascis too for example. On those ocassions achieving absolutely superb, consistent action across the radius of the board thanks to their suited TOM saddle radius, so it certainly is viable in that sense providing you have a compatible TOM bridge to hand. So if you have an offset that already has a TOM, I would perhaps consider firstly checking saddle radius and how that compares to your fingerboard. If it's a miss-match and you really would benefit from a more consistent action for your playing preferences then a number of companies now offer bridge options that will fit your TOM bridge post spaced guitar. Companies such as Mastery and Descendant both now offering TOM friendly replacements that are relatively simple replacements which are well worth looking into. If you have a radius match, but you are experiencing tuning issues (providing you have had the nut slots looked at as that is a key cause of tuning issues) then the string grooves on each saddle can be a result of this. TOMs aren't particularly fond of strings repeatedly passing over their saddles, this can be the case with Bigsby equipped Gibsons too for example, so another option here are roller saddle TOMS. These really do help vibrato equipped TOM instruments, and that can translate to offsets too. But choices other than 12" are often hard to source so instead I would look to the Mastery or Descendant TOM post friendly bridges here.
If you offset is a traditional bridge equipped model and you really wanted to fit a TOM for whatever reason that may be, it really isn't a simple installation I'm afraid. As a result I wouldn't perhaps recommend giving this mod a try unless you have experience in carrying out more intensive guitar work or a great tech who can do it for you. More often than not, post spacing will be quite different to a regular offset bridge, and then post inserts will be different sizes too. So you'll need to remove, dowel and re-drill which aren't the simplest of tasks to do well. I hate to deter people from modding their guitars how they wish, but I would be hesitant to recommend retrofitting a TOM to an offset that doesn't have one, not because of how well they perform, but because of the install process.
But to summarise I have indeed played many TOM equipped offsets that when fitted with a compatible radius saddle version performed surprisingly well. Much better than a forum will tell you it should (or shouldn't). Stable, good intonation and if prepared well (IE saddles accurately slotted and aided for string movement back and forth across them) they worked very well. But I have also played some offsets with un-compatible TOMs and it really was a bad experience, 12" radius on a 7.25" for example with awful inconsistent action and as a result, stability and play-ability issues throughout.
To summarise, I can totally see why so many well known players resorted and settle on this bridge mod years gone by, but in todays offset world when we have oh so many brilliant options available that are better suited. The TOM offset days I think, are numbered.
Prices vary depending on specific TOM bridge, but for example sake, a Gotoh TOM bridge is around £35 at the time of writing this article. 
Photo source - https://www.guitarlovers.pt/shop/aged-buzz-stop-for-jaguar/
The Whizzo 'Buzz Stop'
The option that will likely cause most arguments (well, rage) among the offset community, is The Buzz Stop. Once upon a time before Stay Trem and Mastery, this was your 'quick fix' bolt on item for your string jumping woes. Some players still continue to use them but I would say with the introduction of so many bridges now they have begun to drift into the shadows. Many JM aficionados truly despise the Buzz Stop, so why is this option the 'marmite' of the offset world?
The design is a simple roller bracket which fixes via existing holes on the vibrato tailpiece, it even caters for the trem lock slider. With the roller attached (much like what you will see on a Bigsby which I'm sure is where the design took inspiration), the strings simply pass underneath it and over the bridge.
This is simply to drastically increase the string break angle over the bridge, increasing the string tension resulting in less string jumping and as Whizzo state, reducing the renowned offset string buzz behind the bridge too. All sounds good right? In theory, most certainly yes. A low cost, simple bolt on item, no invasive modding required and enables you to keep the existing bridge (and vibrato too). So why do many players consider these the taboo offset mod? If you're an offset veteran, part of the magic of these guitars is the huge space behind the bridge, the strings resonate differently, it gives the playing string tension a unique feel that I've certainly not experienced with other models, even other 24" and 25.5" scale guitars. The Buzz Stop is often nicknamed the Buzz Kill, for taking away this very detail that makes the JM and Jag unique, also seeming to damped or deaden the tone of the guitar. Which in reality means the resonance is reduced due to the increased string tension. In a time before the Stay Trem and Mastery options for example were available, it was very common for players to opt for the Buzz Stop, like this video of Jeff Tweedy of Wilco in the early '00s armed with a JM fitted with a Buzz Stop below (I'm sharing this as it's relevant and a awesome track, why not?!).
Players who have remained committed to the Buzz Stop have reported adding shims or spacers to where it mounts to help raise the unit and slightly reduce the tension it adds. So perhaps there are ways to coax the best from it, but for the most part these are now overlooked as a dated offset product. In a technical sense, they certainly serve their intended purpose of reducing string buzz and increasing string break angle over the bridge, so if that's what you're after then the Whizzo is right for you. If you love the string tension feel of an JM or Jag, playing behind the bridge À la Nels Cline, then I would suggest looking at bridge options noted earlier in this post.
Either way, the Buzz Stop continues to cause the most rage whatever forum it happens to be mention, and will likely continue doing so as long as they continue making them. I hope this section helps you form your own decision and not what others tell you to think, your guitar and your choices!
The Whizzo Buzz Stop - £32.50 at the time of publishing article

I will say that although when you think of GraphTech material as being a super slick, no binding material, when applied to a traditional rocking bridge I was actually very impressed with how well they aided that design. Good stability on the strings meaning a centrally set rocking bridge worked impressively well, staying put in it's set position and rocking back and forth with the vibrato action, just how you'd want them to be. The V saddle groove clearly aiding this rocking bridge stability, so that was a surprising up side of these saddles.
Conclusion
Let's wrap this up, it's been a long one huh!? So I've looked at a key selection of options, all of which have their own merits and their own avid fans. There are now even more options in the offset bridge market, perhaps most notably those made by 'Halon' who have been well received by the community. I plan to add these to this article once one crossed my workbench and I get the chance to try them out. But for now, I think I've included some key players in the offset bridge world.
One thing you'll come across in the offset community if you're new to it, is that when you meet someone who uses a Stay Trem or a Mastery for example, that they are very firm in their choice and will sing the praises of the item they chose. Which is great to see that pride in a guitar product, but the downside is that it makes it difficult to choose which is the right option for you with so much info to take in.
I hope this post, with each style broken down into sections, provides you with the details you need to make the right choice for you and your offset. Stick with it, they're the some of the most enjoyable, engaging, rewarding and versatile guitars you're likely to pick up. I love them!
Thanks for reading,
James.
Have you made good use of some of the free resources here? Perhaps you might consider kindly supporting this free resource for guitarists via 'Buy me a coffee'! Thank you so much!
Comments
I have fitted Staytrem bridges to a Jazzmaster and Jaguar. The bridge improved sustain and the reduced rocking eliminated a problem I had with the bridge slipping forward or back whilst playing. I have found 10.5-48 strings sufficiently heavy. I have also used StewMac neck shims to increase break angle over the bridges. This invisible change has worked well to increase sustain without compromising the looks or the operation of other components. I have tried the buzz stop and found the best way to fit it is to use washers or spacers to raise the unit above the vibrato plate. Hitting the sweet spot to increase stability and sustain, reduce but not eliminate all the liveliness of the JM system and maintain reliable tuning is a matter of trial and error to suit the individual instrument.