
Let's dive right in, because we have already covered the tools and parts we'll need in the main article HERE.
You may be installing a pre-wired harness, in which you case you can skip this stage and head straight to the install guide, but I thought it would be useful to show how to wire up a Les Paul pot harness from scratch as well!
Pot selection -
I touched on this in the main article, but essentially here the main thing to consider when wiring up Les Paul pots is what pot shaft type you need for your Les Paul specifically. Some models require long shaft pots, whereas some require short shaft pots.You can read more about that HERE. For this Epiphone, I just need short shaft pots and I am opting for CTS 'TVT' series pots, which are essentially 'vintage' inspired audio/logarithmic taper pots from CTS' 450 series range. Ultimately you could choose to go for linear taper, or a different brand or value entirely perhaps depending on the pickup requirements or personal preferences. I'm keeping things simple here by going for pots that I would use in my Signature Series harness range, which are the CTS 'TVT' 500k short shaft audio taper pots for both volume and tone positions. If you have a multi-meter, you could also check the pots to ensure they're all okay and also within tolerance. I do this before every harness build, and the pots I'm using here have a tolerance of +/-10%, so I could see a value as low as 450k and as high as 550k.
Although for these particular series of pots I don't think I've ever had one creep much lower than around 490k, as they usually sit a bit above 500k which isn't totally dissimilar to golden era pots which were a little over valued from most reports on the subject. So I'm looking for values within those tolerances, ideally as close to the stated value as possible though. Say for example sake I test all 4 pots and they measure 500k, 510k, 540k & 535k. I would be inclined to use the 500k & 510k values in the bridge position in an effort not to make the bridge pickup too bright, whereas those slightly higher value pots (which are of course still within the stated tolerances) in the neck pickup positions as that may actually help bring out a little more clarity from the naturally darker sounding pickup position.
If you don't have a multi meter though, don't worry too much, pots from respected suppliers are usually within the stated tolerances, I personally test all pots before sending out so one out of tolerance shouldn't slip the net. 
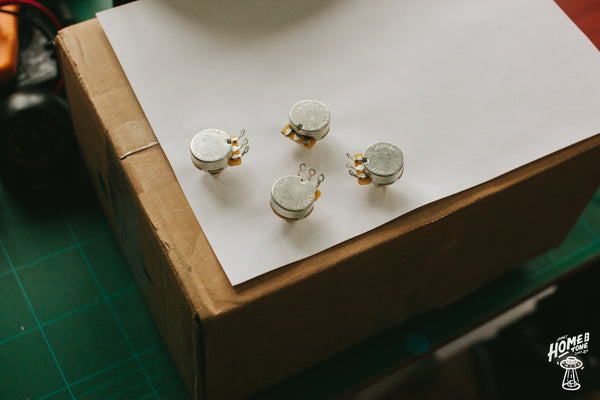
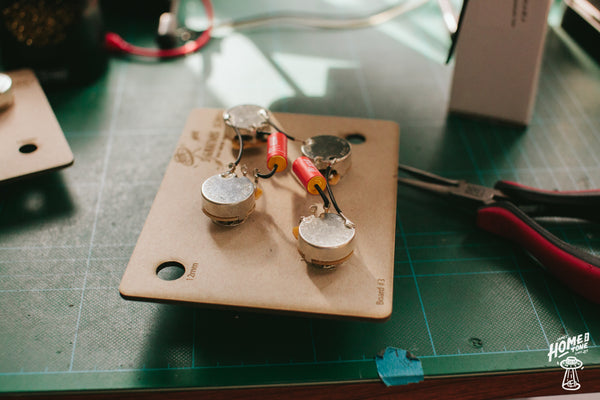
I would refrain from mounting these straight into the guitar and soldering everything in situ, as touched on in previous articles, LP cavities are fairly tight, but more importantly are quite deep making soldering in situ quite fiddly. I have my pre made harness mounting boards here which make my life easier of course, but if you don't have any boards, make one from cardboard! Lay a piece of paper or cardboard over the 4 pot holes in the body and mark out their locations. Make a hole through each marking and bingo! You have a nice template to make your harness on, also knowing that it will be a nice fit when you come to install it into the body.
Caps wise, I'm sticking with the commonly used and popular .022uF value in both neck and bridge positions, you can experiment with values if you wish to. A higher value cap will have a greater effect on the treble frequencies, so a .047uF will sound a little warmer and have a more drastic effect on treble roll off than a .022uF. Likewise, a .015uF value cap will allow a little more trebles through the signal for a slightly brighter response than a .022uF. If you are in a position where you have had chance to experiment, then you may already have a firm idea of what values you like or know what works for different pickup or guitar types. But if you're really not sure, .022uF is commonly used in Les Pauls and works great.
So let's get soldering! With my pots mounted to the template board, the first thing I will do is decide on which wiring style I am going to wire up and prepare the pots accordingly. 50s or modern style wiring, the endless debate. Despite what anyone on a forum or FB group may say, this is entirely up to you which you will actually prefer in practice. One doesn't rule all, both have their merits, it all comes down to how you use you controls to achieve the sounds/response you like. No one can decide that for you, unless of course you are trying to replicate a specific guitar and want to be accurate in it's reproduction.
Here are links to the two styles of wiring diagrams (left handed versions are of course also available on the main schematics page HERE)
50s Style Les Paul wiring diagram
Modern Style Les Paul wiring diagram
Comparing the two side by side, you will hopefully have noticed that it is only where the tone capacitor is attached and where the tone pot is grounded. So you can use the same parts/components for either style, it is just where you attach the components that makes the wiring styles differ. To summarise the difference in real terms (IE how they sound/respond differently), for 50s wiring due to the tone cap being attached to the output lug of the volume pot this can help with some aspect of treble frequency retention acting a little like a treble bleed mod. So when you roll down your volume pot, you may find the trebles remain a little clearer rather than muddying up. I don't think this is quite as effective as a dedicated treble bleed mod, but it does help a touch and is a natural sounding response. A downside of this wiring style is that when you roll down your tone pots, you will notice a slight drop in volume also. For most players this isn't a problem, but it's worth considering when deciding which style suits you.
For modern style wiring, the tone cap is instead attached to the input lug of the volume pot, which doesn't have the same effect on treble retention as 50s style. So you may find when you roll down the volume, it darkens up the overall sound a little. Some players counteract this by adding a treble bleed cap mod to the volume pot so that is certainly an easy solution. But you won't have any volume drop when rolling the tone pot down. Some players argue that 50s wiring is more 'intuitive' for the player, altering controls to clean up your tone etc, but again this is all personal preference/experiences. But I hope this brief description helps you decide which suits you best. Today, I'll be wiring two harnesses to show both methods side by side to hopefully help guide you along the way! To try and help display each one, I'm making the 50s style harness (the one that will be installed into this guitar) with the short shaft pots, and the modern style harness with long shaft pots. 
Preparing the pots and 'pre-tinning'
Pre-tinning is a vital part of wiring up guitar parts, making your final connections solid (and easier!). So here's a demonstration of pre-tinning pots, both for the pot lugs and their casings for your ground connections. A pot is a variable resistor, and usually has three lugs. Lug 1, lug 2 the 'sweeper' which is connected to the component that moves/turns along the contact patch inside the pot, and lug 3. You can wire them in a variety of ways and the difference between 50s and modern wiring demonstrates an example of that.
I start by carefully bending the lugs so they sit a little straighter which will give us more working space and a neater looking install if that's your thing. Do you have to do this, certainly not, but it's how I approach making my own harnesses so wanted to stay true to that in these examples.

The eagle eyed of you may have spotted that I haven't bent back the 'lug 1' on my tone pots. They're not actually used for either of these wiring styles so I personally grab my cutters and snip these lugs off entirely, but you can also just keep them on the pot too, personal preference really but I just find it's one less thing in the way, they're not required and it neatens things up visually. 

Now onto pre-tinning! For this I turn my soldering iron on, allow it to warm up and set it to around 400 degrees Celsius. I ensure the iron tip is tinned, where I flow on a little solder coating it and wipe it clean. For good heat transfer and a clean solder joint, you want the soldering iron tip, or at least the face you're using on the tip, to be clean and tinned.

The first thing I do (simply by habit) is to pre-tin all of the pot lugs firstly. So I'll place the iron tip onto the pot lug to allow the joint to warm up. Flowing solder onto a cold joint will simply make for a bad connection/joint, so warm it up a little and flow some solder onto the lug. If you want to practice this before doing it on your new pots, grab some old spares or something similar and get a feel for warming the joint up and how solder 'takes' to a surface. It really won't take long to get a good feel for this which will make wiring up your harness feel much easier.
Quick tip though, make sure you don't fill the lug hole up with solder, as that might make your wire connections trickier later. Just flow a small amount of solder around the lug itself leaving the lug hole clear for your wire connections.
With all of the the now lugs tinned, you can now move onto the pot casings for the ground connections. The volume pot casings for both 50s and modern wiring will be prepared the same way, but how we prep the tone pots will differ slightly here. This is because a different lug is soldered to ground between the two wiring styles as shown on the wiring diagrams linked above. For 50s style wiring Lug 2 is attached to ground (the pot casing) whereas modern wiring, lug 3 is attached to the ground pot casing.
You could ultimately approach this in a number of ways, some people bend the pot lugs back, some use a small length of wire between the lug and the casing. either is absolutely fine, and I do actually use a little of both approaches for my own harnesses simply out of preference or where I'll be adding my ground bus wires between each pot. I'll just share my personal way of doing it so at least things don't get over complicated.
Let's start with the volume pots seeing as they're the same for both modern and 50s styles. I start by pre-tinning a small area of the pot casing near to where lug 3 of the volume pot sits. To pre tin the pot casing, simply place the warmed iron on the casing area you wish to tin, and allow the casing to warm up a little.
Then flow a very small amount of solder onto the casing, you should see the solder 'take' to the surface. If it doesn't then chances are the casing isn't warm enough for the solder to flow, or your soldering iron tip isn't clean enough. Take a breather if that is the case, clean the iron tip, tin it again if needed but most importantly, don't allow yourself to get frustrating and keep trying to heat the pot casing up too much. Give it chance to cool off a little and try again.
So we've finished prepping the two volume pots, and now I'll show you how I either bend the lug back safely to solder to the casing to ground, or use a jumper wire.
Using my long nose pliers, I hold the end of the lug and bend it to a 90 degree angle away from the pot casing like so..
Then with my long nose pliers again, just underneath that bend in the lug, I grip that and turn the lug towards the casing so the solder tab on the lug is almost sitting flush against the casing. I find this is a nice, safe and neat looking way of doing this. Some may just bend it straight back though, either is fine I'm sure!

With that now bent back and sitting flush against the pot casing. I can warm the joint up and flow some solder onto the connection to complete.
If you want to use a jumper wire, simply grab some tinned copper bus wire or just some ordinary 22awg cloth covered wire etc, and push some of the wire through the lug and up to the area you have pre-tinned on the pot casing.
I must say that I tend to prefer using a jumper wire to ground the neck volume pots ground lug as I can then use that same piece of wire as the ground connection to the neck tone pot keeping things looking quite neat. Whereas the bridge volume pot, if I did the same, that wire length will be in the way when I come to make other connections later on, so I tend to aim to keep pot ground wires on the outer edges of the pots following the body cavity edges. So I bend the lug back on the bridge volume pot, which maximises working space that side of the harness and keeps things looking neat overall with all of the ground wires following the cavity shape on the outer edge. Again, very much just a personal preference thing ultimately. 
(50s wiring example)
Now we can move onto the tone pots. As I briefly mentioned earlier, which tone pot lug gets soldered to ground differs between 50s style wiring and modern style wiring. For 50s style wiring, the middle lug 2 'Sweeper' gets soldered to the pot casing. I tend to do this by bending the lug back so it sits against the casing. This is a simple approach but also looks rather neat too I think. But you can of course do it via a little jumper wire again too if you prefer. So I first pre tin a little area of solder on the pot casing near to where the lug will be soldered to. 


For 50s wiring a neat place to do this is directly 'behind' lug to on the edge of the casing, you can then bend that lug back neatly to make your connection as above. Repeat this process for both neck and bridge tone pots.
For modern style wiring, do something similar to what we did for the volume pots, tin a little area on the pot casing just behind where your lug 3 sits.


For modern wiring, it is lug 3 which is ground to the casing (much like the volume pot for example). So pre tin a small section of the casing directly behind lug three on the two tone pots for modern wiring style, ready for you to solder the lug to and complete your ground connection there. Repeat the process for each tone pot.
With the ground lugs now soldered to the casings, we can now look at ground connections between the 4 pots. This is essentially only done via 3 wires, you could use any wire really to do this, I'm using my usual 20awg tinned copper bus wire, but you could use some plastic coated or cloth covered 22awg wire for example too. Do not however connect all for pots, this will cause a ground loop, only put a ground wire between the neck volume pot and neck tone pot, neck tone pot and bridge tone pot then finally bridge tone pot and bridge volume pot. You can do this a number of ways and approaches, I've just shown a photo of how I do it which is towards the outer edge of the pots and following the cavity 'walls' so to speak. This keeps them nice and out of the way really, but you may have a different approach so feel free to find a way that suits you. This is the same for both 50s and modern wiring too by the way. I tend to add a little heat shrink too, just to shield the sections of the wire that are close to the pot lugs or a 'hot' connection. Where you want to place your ground wire connection, as above, pre tin a little surface area of the pot casing before making your main connection and that should make the solder joint to the pot casing much easier for you. 
There we have it! Pots section of Les Paul harness/loom ground and ready for some caps.
I start by adding a small length of heat shrink to the cap lead outs. Just to help prevent them from touching anything you don't want them to touch when it's all installed really.
I then snip one end of the lead out ready to make the first connection to the pots. I tend to start with the tone pot side of things, no other reason than habit!
Starting off with the 50s style harness, this cap leadout is attached to lug three on the tone pot, so I place it in position and steady it ready to heat up the joint and flow some solder on.
Then of course repeat the process for the other tone pot and cap.
I then gently bend the cap lead outs around and prepare to add the other end of the cap to the volume pot. As briefly mentioned towards the start of this article, for 50s style wiring the tone cap is attached to lug 2 of the volume pot. So I bend it around, cut the cap leadout wire to a suitable length and solder it to the central lug 2.
Pro tip! Try to leave some of the volume pot lug hole empty here, try not to fill it up with a blob of solder. You'll thank me when you come to install this into your guitar and find you can fit your switch wire into this to make the final solder connection. Rather than having to heat the joint to push the wire in. Much easier to just allow for a bit of space and it all fits nicely that way. Hopefully the photo above shows how the tone cap is soldered to lug 2 of the volume pots but you still have space in the lug hole for later on.
Similar process here with the modern style wiring scheme, but different pot lugs. So the tone cap is attached to lug 2 on the tone pot and lug 1 on the volume pot. Prepare the cap as above and connect to these relevant lugs for this schematic using the methods shown above.

One modern loom ready to go!
There we have it! We've wired up a 50s & modern style wiring harness for a Les Paul and they're ready for the next steps.For some, this may be all you need to replace and use your existing switch/jack harness. But you may also want to wire up a new switch too and the next few articles will show how that is done!
I do recommend (however useful this article and the photos/info may be) to cross reference to your specific wiring diagram throughout to ensure the correct connections are made.
Don't forget, I stock all of the components featured in this article so if you are planning to re-wire your Les Paul and will be using this article to help along the way, please do consider supporting my store and ordering the parts from the website. Really appreciate your support!
James.