What a fantastic project this was! Can't beat a build project that really captures personality, a spot of nostalgia and the true essence of custom work. One of my regular customers asked me about helping bring a Jazzmaster vision he had to life, and after a few chats about it, the direction to go in etc, it was time to get stuck in. Only right to share some of those build stages with you!
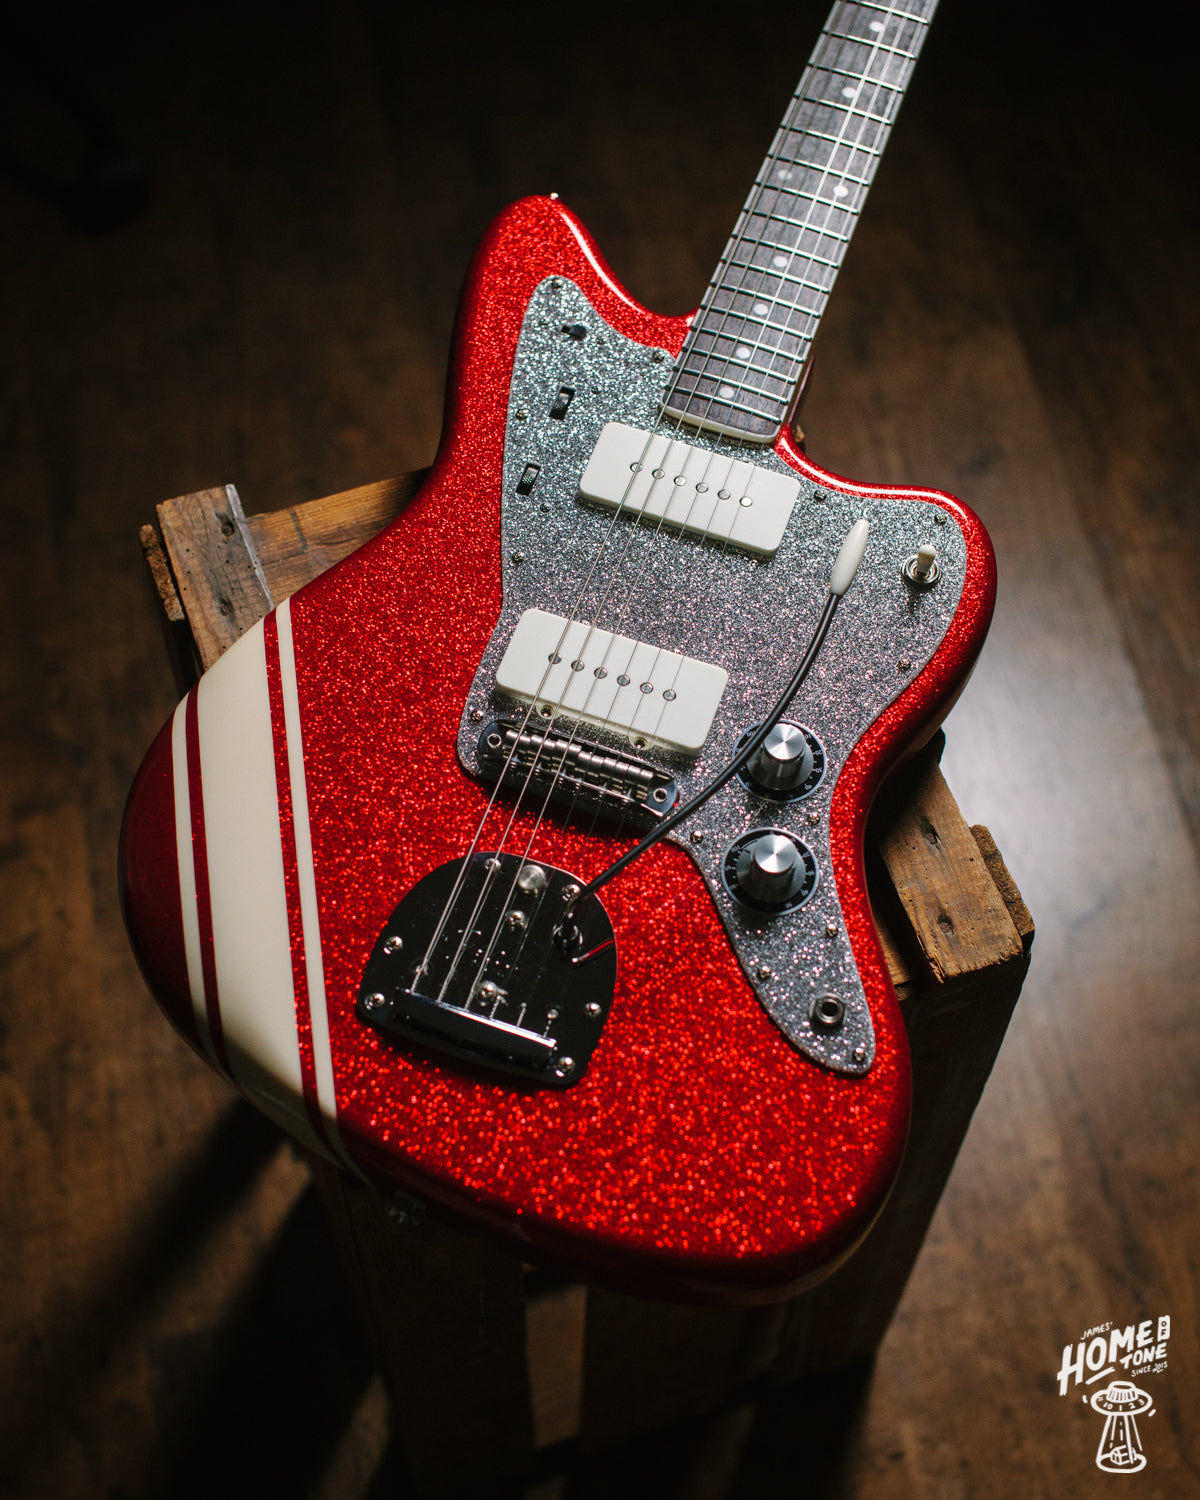
There were a few details for the aesthetic and approach for the project that were a 'must have', whilst some other elements where it was open house and I was able to throw some ideas into the mix too. The must haves were it to be pretty true to vintage in terms of overall guitar specs; body size/shape/contours, traditional wiring style, traditional vibrato, classic JM headstock size and shape and a bound and dot marker fingerboard. But perhaps most importantly, for it to have a nice and bold candy apple red metal flake finish and a '69 Mustang inspired competition stripe! I was sold on the idea, I love traditional Jazzmasters, and I love dot and bound fingerboards. But the paint had me very excited about the build for sure. It's such a strong, unique look and what custom should be about! Making it your own. The owner told me about how inspired by guitars he'd seen growing up, where in particular sparkle finishes and in particular, details like the Comp stripes really stood out to him, so this was as much a nostalgia inspired build as it was a dream build too.
The rest was up for discussion, which exact pieces of hardware, pickups, wiring specs etc. So we bounced ideas back and forth to land on some final details that worked, which I'll touch on later on in this article.

A lot of this project discussed was sparked by the customer seeing my own custom, in house made Strat style build take shape over the months. He saw the body I made and it got the project idea cogs turning. But as making things like bodies, with more basic tools can mean a longer, more in depth production time. To be a little more cost effective for the customer, I opted to suggest involving a few of my fellow UK companies to be part of this project, first up Neil Haynes from Guitar & Bass Build (and Haynes Guitars) to assist with his great work making bodies and necks. Neils work is very precise, with neatly made necks and bodies which help form really solid base elements for a build. The final specs on the body was to be a 2 piece, white ash body, and a maple neck with rosewood fingerboard that is bound and has traditional dot-markers. It wasn't too long before this finished body and neck were with me and I was able to get stuck in.

One detail that Spence really liked on some prior custom work I had done, was for a rolled fingerboard edge and rounded fret ends. So I set to work carefully rounding over the fingerboard edge binding to give it a super comfy feel in the hand, and dressing the fret ends to compliment that too. I wanted to try and do some prep to the neck, frets and nut prior to it heading out for paint. I always think a nice detail on a build is when the lacquer goes over the edge of the nut, more of a factory finish so to speak. So I roughed in a bone nut blank so it had that installed and in situ, ready to be lacquered. I only partially finished the fretboard edge rolling as I figured I'd need to do some final touches to that once it's all lacquered. Neil did a great job with the body and neck though, super pleased with the results and were a pleasure to receive for this project. Honour to have him be part of this one too.
So, onto paint! I am a huge fan of Rob Fleet at RF Custom, he does some beautiful finishing work and have always wanted to ask him to be a part of a project. When I was asked for a bold candy apple red flake finish, it seemed only right to contact Rob. From our first conversation about the job, he came back straight away with some amazing options and example photos of the finishes for us to choose from, making that process a breeze. So with the body and neck with me and prepped, off they went to Rob for all of his finishing work. Understandbly, Rob is a busy man, so we waited for our paint shop slot, which was well worth it when the first few teaser photos came through. Here's some photos the day they arrived back with me -


To be honest, these photos truly don't do the sparkle, or colour justice, but needless to say it still looks amazing. The chunky flake was precisely what we hoped for, and caught the light in every angle. The retro comp stripe, super bold with crisp lines and lovely parchment/antique white colour which complimented the neck's binding too.

First up for me was refining the neck pocket. It was a fairly snug fit prior, but of course now we have lacquer on the neck, I just wanted to ease some of the edges so it wasn't quite as tight a fit. You often see online, videos and clips of these tight neck pocket/joints, which is all well and good, but to me that rings alarm bells for the future. Wood is pretty organic so at the very least, humidity shifts need to be taken into account. Also with bolt on necks too, how we play them, leaning on the neck or simply moving them around etc, is something to be considered. So I still want a secure pocket fit, but I want it to be a comfortable fit so we don't see splits down the line. I cleaned up the edge of the lacquer, carefully rounding the edges so there aren't any sharp lines that could catch during any future neck removal/maintance etc. A little bit of time and I had a neck joint I was really happy with, secure and sure footed, but not overly tight that would cause issues later.

Next up, copper foil shielding for the full wiring cavity. Jazzmasters can be prone to 60 cycle hum. You have big single coils and very long wire runs, a recipe for extra noise. So if I have the chance to on a fresh project, I generally opt to shield a JM.

Some simple assembly preparation next, strap button holes marked, drilled and counter-sunk. I generally counter sink any wood screw holes on a body. This helps reduce the risk of paint chip out or splits when installing the screw later on. Maybe get away with it on a relic build, but on a crisp new paint job like this, the last thing anyone would want to see is lacquer splits or chips!


I personally prefer to ground the strings via the tailpiece on offsets that will have a rocking traditional bridge. Although the bridge thimbles can be fine to use for this, I find with a bridge that by design rocks and moves within those inserts, having the string ground wire securely against the tailpiece plate instead, where those strings are anchored, is the better place for continuity and quieter use. So in went the bridge thimbles as normal.

We wanted a traditional tuner style, so on went a trusty set of Gotoh SD91's, lined up, drilled and mounted.

With the tuners on, it was time to get the neck mounted up and finish up the fret and top nut work.


Starting to look seriously good now it's in one piece! Next up was a super fun stage, the custom pickguard. Now this aesthetic idea came about from the customer popping by to have a catch up on the progress before the final stages. We were trialling different pickguard materials, parchment, mint green, tort and black, some looked cool but none were really making us think 'wow, that's the one!'. Then I threw the idea out there of a sparkle pickguard, and we really took to the thought. But what colour? Somehow we landed on a sparkle silver, and I then set to work seeing how I could bring that to life. I considered the option of making/sourcing a clear pickguard and back painting it with flake and silver. But trying to capture a metal flake/sparkle chunky or simply put, good enough, to complete with the awesome body flake, I decided against it. I then managed to source a big sheet of flake acrylic material, and the moment that sheet arrived in the post I knew I had the right material for the job in my hands.

I set to work making the pickguard in house, not usually a task I particularly enjoy to be totally honest! But with that sparkle looking back at me, this was the exception for sure. It slowly but surely started resembling a classic JM pickguard shape, and I loved what I was seeing emerge.

With the pickguard made, I could then set to work making my wiring harness for it. I lined the rear of the pickguard with copper foil, and got the soldering iron warmed up.

Traditional spec here throughout. Rhythm circuit with traditional 1meg/50k pots and .022uF cap. Lead circuit with a pair of 1meg pots, .033uF cap but with the addition of a treble bleed on the volume. All the usual good bits found on my signature series kits, Switchcraft, CTS, Pure Tone and Gavitt. Pickups are the great McNelly 46/58 set.

With that all wired up, I could prep for mounting. Lining up and drilling for the pickguard screws, positioning of the pickup height foams and making the final few connections.

The customer actually already had a great condition Fender AVRI vibrato unit, taken off his Jag when we equipped a Mastery set on that. Seeing as some traditional features were the goal on this project, we put it to good use, albeit with the addition of the Staytrem arm and collet. These are a great, must-do mod to the AVRI in my opinion. The collet helping keep the arm from falling out, and the arm shape much more comfortable in use. Seeing as we were going with a Staytrem bridge, if felt right to go for the arm/collet kit too

So with all the hardware on, the wiring all done, the pickguard made and fitted. It was time for strings! After stringing up, it became apparant it would benefit from a shim, so I use the nice full pocket Stew Mac shim which worked great. With that on, strings settling in at tension allowing me to dial in the neck relief, I could finish off the top nut and begin getting a feel for it's overal setup.

And there we have it. Some steps I haven't featured, simple string guide installs etc, but I wanted to share some of the main elements of this project here and have hopefully done so. Let's get onto the final beauty shots!


A big thank you to Spence for asking me to bring his dream JM to life, was a really fun project. To be able to include some of my fellow UK guitar companies in it too made it even better, Neil at Guitar & Bass Build, and Rob at RF Custom, thank you guys.
Full final specs of the build -
2 piece white ash body
Maple neck with rosewood fingerboard, bound and dot (9.5" radius)
Custom candy apple red flake paint finish with '69 style comp stripe in antique white, with neck finished in a vintage amber tint lacquer
Fender AVRI vibrato unit with Staytrem arm and collet
Staytrem bridge
Home of Tone Signature Series traditional Jazzmaster wiring
McNelly 46/58 pickup set
Antique white pickup covers
Home of Tone UFO aluminium control knobs w/dial washers
Home of Tone flush mount rhythm/lead slide switch spacer kit
Gotoh SD91 tuners
Gotoh strap buttons
Gotoh String tree
Fender 'F' neck plate
Stew Mac neck shim
There were a few details for the aesthetic and approach for the project that were a 'must have', whilst some other elements where it was open house and I was able to throw some ideas into the mix too. The must haves were it to be pretty true to vintage in terms of overall guitar specs; body size/shape/contours, traditional wiring style, traditional vibrato, classic JM headstock size and shape and a bound and dot marker fingerboard. But perhaps most importantly, for it to have a nice and bold candy apple red metal flake finish and a '69 Mustang inspired competition stripe! I was sold on the idea, I love traditional Jazzmasters, and I love dot and bound fingerboards. But the paint had me very excited about the build for sure. It's such a strong, unique look and what custom should be about! Making it your own. The owner told me about how inspired by guitars he'd seen growing up, where in particular sparkle finishes and in particular, details like the Comp stripes really stood out to him, so this was as much a nostalgia inspired build as it was a dream build too.
The rest was up for discussion, which exact pieces of hardware, pickups, wiring specs etc. So we bounced ideas back and forth to land on some final details that worked, which I'll touch on later on in this article.
A lot of this project discussed was sparked by the customer seeing my own custom, in house made Strat style build take shape over the months. He saw the body I made and it got the project idea cogs turning. But as making things like bodies, with more basic tools can mean a longer, more in depth production time. To be a little more cost effective for the customer, I opted to suggest involving a few of my fellow UK companies to be part of this project, first up Neil Haynes from Guitar & Bass Build (and Haynes Guitars) to assist with his great work making bodies and necks. Neils work is very precise, with neatly made necks and bodies which help form really solid base elements for a build. The final specs on the body was to be a 2 piece, white ash body, and a maple neck with rosewood fingerboard that is bound and has traditional dot-markers. It wasn't too long before this finished body and neck were with me and I was able to get stuck in.
One detail that Spence really liked on some prior custom work I had done, was for a rolled fingerboard edge and rounded fret ends. So I set to work carefully rounding over the fingerboard edge binding to give it a super comfy feel in the hand, and dressing the fret ends to compliment that too. I wanted to try and do some prep to the neck, frets and nut prior to it heading out for paint. I always think a nice detail on a build is when the lacquer goes over the edge of the nut, more of a factory finish so to speak. So I roughed in a bone nut blank so it had that installed and in situ, ready to be lacquered. I only partially finished the fretboard edge rolling as I figured I'd need to do some final touches to that once it's all lacquered. Neil did a great job with the body and neck though, super pleased with the results and were a pleasure to receive for this project. Honour to have him be part of this one too.
So, onto paint! I am a huge fan of Rob Fleet at RF Custom, he does some beautiful finishing work and have always wanted to ask him to be a part of a project. When I was asked for a bold candy apple red flake finish, it seemed only right to contact Rob. From our first conversation about the job, he came back straight away with some amazing options and example photos of the finishes for us to choose from, making that process a breeze. So with the body and neck with me and prepped, off they went to Rob for all of his finishing work. Understandbly, Rob is a busy man, so we waited for our paint shop slot, which was well worth it when the first few teaser photos came through. Here's some photos the day they arrived back with me -
To be honest, these photos truly don't do the sparkle, or colour justice, but needless to say it still looks amazing. The chunky flake was precisely what we hoped for, and caught the light in every angle. The retro comp stripe, super bold with crisp lines and lovely parchment/antique white colour which complimented the neck's binding too.
First up for me was refining the neck pocket. It was a fairly snug fit prior, but of course now we have lacquer on the neck, I just wanted to ease some of the edges so it wasn't quite as tight a fit. You often see online, videos and clips of these tight neck pocket/joints, which is all well and good, but to me that rings alarm bells for the future. Wood is pretty organic so at the very least, humidity shifts need to be taken into account. Also with bolt on necks too, how we play them, leaning on the neck or simply moving them around etc, is something to be considered. So I still want a secure pocket fit, but I want it to be a comfortable fit so we don't see splits down the line. I cleaned up the edge of the lacquer, carefully rounding the edges so there aren't any sharp lines that could catch during any future neck removal/maintance etc. A little bit of time and I had a neck joint I was really happy with, secure and sure footed, but not overly tight that would cause issues later.
Next up, copper foil shielding for the full wiring cavity. Jazzmasters can be prone to 60 cycle hum. You have big single coils and very long wire runs, a recipe for extra noise. So if I have the chance to on a fresh project, I generally opt to shield a JM.
Some simple assembly preparation next, strap button holes marked, drilled and counter-sunk. I generally counter sink any wood screw holes on a body. This helps reduce the risk of paint chip out or splits when installing the screw later on. Maybe get away with it on a relic build, but on a crisp new paint job like this, the last thing anyone would want to see is lacquer splits or chips!
I personally prefer to ground the strings via the tailpiece on offsets that will have a rocking traditional bridge. Although the bridge thimbles can be fine to use for this, I find with a bridge that by design rocks and moves within those inserts, having the string ground wire securely against the tailpiece plate instead, where those strings are anchored, is the better place for continuity and quieter use. So in went the bridge thimbles as normal.
We wanted a traditional tuner style, so on went a trusty set of Gotoh SD91's, lined up, drilled and mounted.
With the tuners on, it was time to get the neck mounted up and finish up the fret and top nut work.
Starting to look seriously good now it's in one piece! Next up was a super fun stage, the custom pickguard. Now this aesthetic idea came about from the customer popping by to have a catch up on the progress before the final stages. We were trialling different pickguard materials, parchment, mint green, tort and black, some looked cool but none were really making us think 'wow, that's the one!'. Then I threw the idea out there of a sparkle pickguard, and we really took to the thought. But what colour? Somehow we landed on a sparkle silver, and I then set to work seeing how I could bring that to life. I considered the option of making/sourcing a clear pickguard and back painting it with flake and silver. But trying to capture a metal flake/sparkle chunky or simply put, good enough, to complete with the awesome body flake, I decided against it. I then managed to source a big sheet of flake acrylic material, and the moment that sheet arrived in the post I knew I had the right material for the job in my hands.
I set to work making the pickguard in house, not usually a task I particularly enjoy to be totally honest! But with that sparkle looking back at me, this was the exception for sure. It slowly but surely started resembling a classic JM pickguard shape, and I loved what I was seeing emerge.
With the pickguard made, I could then set to work making my wiring harness for it. I lined the rear of the pickguard with copper foil, and got the soldering iron warmed up.
Traditional spec here throughout. Rhythm circuit with traditional 1meg/50k pots and .022uF cap. Lead circuit with a pair of 1meg pots, .033uF cap but with the addition of a treble bleed on the volume. All the usual good bits found on my signature series kits, Switchcraft, CTS, Pure Tone and Gavitt. Pickups are the great McNelly 46/58 set.
With that all wired up, I could prep for mounting. Lining up and drilling for the pickguard screws, positioning of the pickup height foams and making the final few connections.
The customer actually already had a great condition Fender AVRI vibrato unit, taken off his Jag when we equipped a Mastery set on that. Seeing as some traditional features were the goal on this project, we put it to good use, albeit with the addition of the Staytrem arm and collet. These are a great, must-do mod to the AVRI in my opinion. The collet helping keep the arm from falling out, and the arm shape much more comfortable in use. Seeing as we were going with a Staytrem bridge, if felt right to go for the arm/collet kit too
So with all the hardware on, the wiring all done, the pickguard made and fitted. It was time for strings! After stringing up, it became apparant it would benefit from a shim, so I use the nice full pocket Stew Mac shim which worked great. With that on, strings settling in at tension allowing me to dial in the neck relief, I could finish off the top nut and begin getting a feel for it's overal setup.
And there we have it. Some steps I haven't featured, simple string guide installs etc, but I wanted to share some of the main elements of this project here and have hopefully done so. Let's get onto the final beauty shots!
A big thank you to Spence for asking me to bring his dream JM to life, was a really fun project. To be able to include some of my fellow UK guitar companies in it too made it even better, Neil at Guitar & Bass Build, and Rob at RF Custom, thank you guys.
Full final specs of the build -
2 piece white ash body
Maple neck with rosewood fingerboard, bound and dot (9.5" radius)
Custom candy apple red flake paint finish with '69 style comp stripe in antique white, with neck finished in a vintage amber tint lacquer
Fender AVRI vibrato unit with Staytrem arm and collet
Staytrem bridge
Home of Tone Signature Series traditional Jazzmaster wiring
McNelly 46/58 pickup set
Antique white pickup covers
Home of Tone UFO aluminium control knobs w/dial washers
Home of Tone flush mount rhythm/lead slide switch spacer kit
Gotoh SD91 tuners
Gotoh strap buttons
Gotoh String tree
Fender 'F' neck plate
Stew Mac neck shim