Nik first reached out to me to inquire about some pickups and wiring for a partscaster project he was starting. Cut a long story short, he kindly opted for a loaded pickguard from myself, including the awesome McNelly 'S-Bar' hybrid strat pickup design, wired to a 7-way Strat harness and all mounted to a nice pearloid pickguard w/parchment plastics to soften the colours a little. Whilst we waited for the pickups to be made and arrive, we discussed his project further and he kindly asked me to assemble the whole guitar when everything was ready.
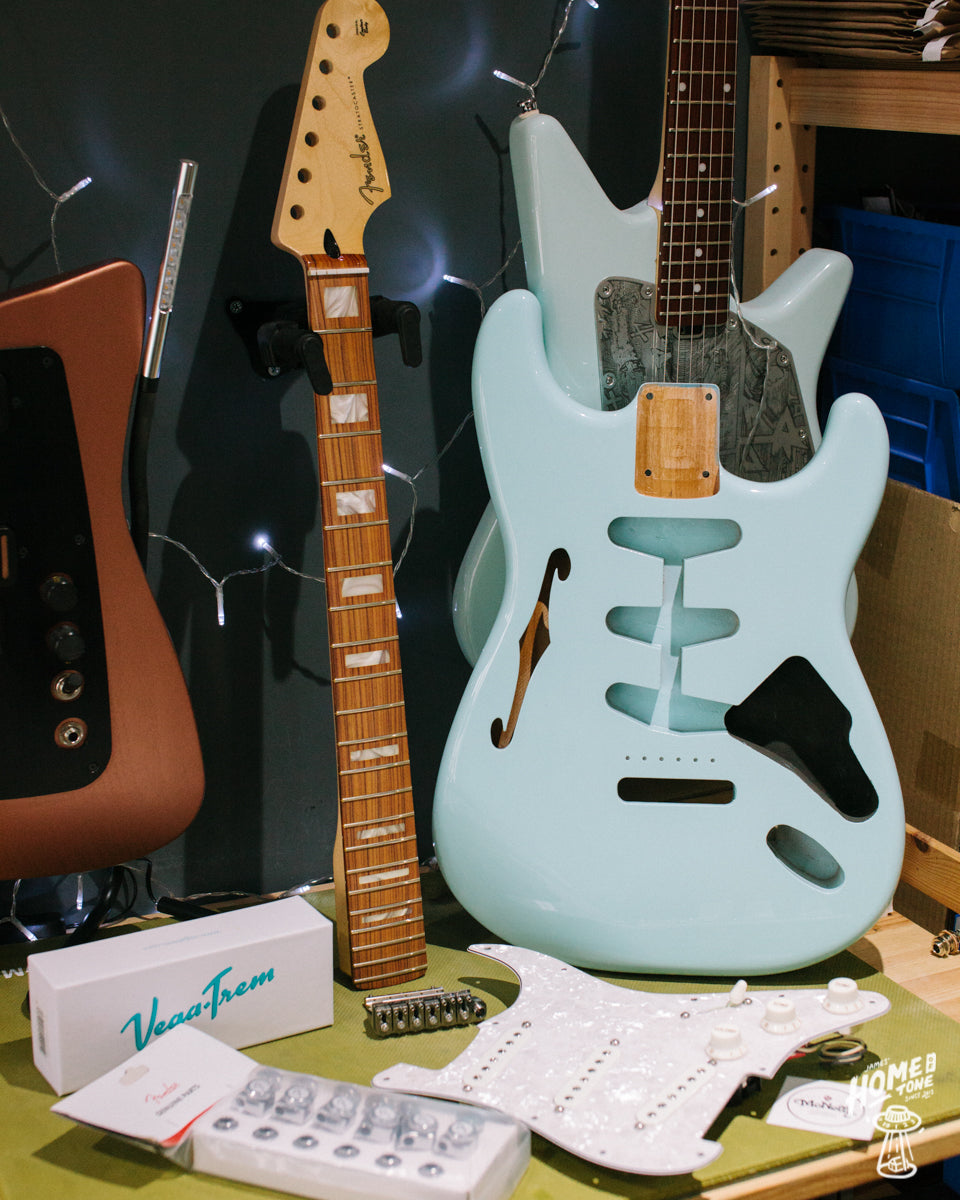
So here we are! All bits dropped off to me and ready to start the build. We have a really really nice semi hollow Eric Johnson inspired Strat body, a genuine Fender Mexico block inlay modern neck, Fender locking staggered post tuners, a Vega-Trem vibrato unit and of course, my loaded pickguard.
First on my job list was tackling some of the the Vega-Trem install. The body had pilot holes for a traditional/vintage 6 point bridge, but this particular Vega kit was for a modern 2 point style bridge. No problem though and were compatible, just meant I needed to drill for the threaded body inserts before the mount/pivot plate could be attached to the body.


So I lined things up and double checked the location of the mount points of the plate and prepared for drilling. Always a case of check/measure twice(or an extra couple of times on top for good measure) on tasks like this, vital it's right first time really. Using my handy little drilling guide, proceeded to work up through the drill bit sizes until the right hole size was achieved.


Then I popped some vaseline in the drilled hole ready to thread the insert in. I have fitted a Vega-Trem before, and found that these threaded inserts (in particular the notches to allow for a flat head screwdriver) were a smidgen on the brittle side. So took my time here, and the vaseline helps too as you work a thread into the body wood and gradually fit the insert. All went okay though and repeated the process for the second insert...


Now time to fit the pivot plate.

With the pivot plate fitted, providing me with another marker point and straight edge to line things up with, I proceeded to line up the loaded pickguard and drill for the pickguard mounting screws. With a tiny pilot hole drilled for each position, I removed the pickguard and drilled the correct hole size and finally countersunk. I do this on pickguard screws to reduce risk of lacquer checking around the pickguard holes. I find these pressure points are common starting points of checking, so giving the screw threads a little more breathing room upon install reduces the risk of any chip out and unwanted damage/pressure to the area resulting in finish issues down the line. Looks neater too I think!


Then it was onto the jack mounting plate, similar process here of lining up, drilling, countersink and all ready. I personally mount the jack to the plate when lining up too, I often see on partscaster builds situations where the jack lead when engaged with the jack fouls the jack cavity walls because it is all too close to the edge. Mounting the jack to the plate allows you to move it around and find the perfect position for it where it'll all be clear when fitted.


I then opted to fit the neck, so I could proceed with the fretwork. Having the neck bolted up to the body/neck pocket with the tension applied at the 4 neck bolt screws allows for a more accurate level check. I didn't need to align the neck at this stage, I'll correct that if needed a little later on when I am installing the bridge and can accurately set it. For now, just the tension on the neck bolts is all that is really needed. But I did use the opportunity of first fit of prepping the neck mount holes. The genuine Fender neck came with the 4 screw holes pre drilled, these were the correct size and depth too. But something I do on any new neck install is prep the holes for a safer first fit.

I start of by countersinking each hole a little. I find this helps reduce strain when installing the screws and reduce risk of damage/splits etc.

Then with that done, I apply some vaseline to each hole and install each screw. Ultimately these are self tapping screws so would do this on first install anyway, but in circumstances like these, I find it easier to do it separate to the body so I can monitor the progress and check all is going smoothly. The screw goes in a little easier cutting it's thread into the maple with the vaseline, worth doing first time around I find.


Hopefully you can see in the image, no damage to the neck wood, no strain on the initial edge, and the thread has cut nicely in the hole. This will make the process of installing the neck a little easier and stress free.

Nik supplied a nice new genuine Fender 'F' logo neck plate for this one, a nice touch against the genuine Fender neck I thought.

So onward with the fretwork. Ultimately despite being a genuine Fender replacement neck, these still require some final finishing/fretwork before they're perfect. So I check out how level and consistent the fretboard is with my notched straight edge, and get to work correcting the fret level and radius.
There were a number of high spots so I worked through my leveling file and onto the beam.

I thought this photo captured the amount of leveling/radius correction a new partscaster neck needs, even a nice new Fender item like this one. Even if a company states their replacement/partscaster necks are leveled, crowned and polished I'm usually somewhat dubious if I'm honest. It's best to do it in situ, under tension etc. Most notably you can see the flat top edge on that 21st for example. All no problem though of course and a stage I expect to do on a partscaster build, ultimately this care and attention at this stage really helps play-ability and set-up so fully worth it.

With the level completed, it was onto the crown and polish.


Starting to look really nice! With those polished up, I gave the fretboard some attention as it was particularly dried out. The first application of quality Music Nomad F-One oil literally soaked right in! Couldn't believe it, disappeared before my very eyes haha! So I buffed that and applied some more before finishing up with some nice Monty's 'Instrument Food' wax, which really helped condition the Pao Ferro board and emphasise the nice bold grain lines.


Very pleased with that, looks great! I took the opportunity here to also begin with some of the top nut refinement. This neck came fitted with a new top nut, but also thankfully was oversized meaning I can correctly set the string slot depths upon the set-up myself, and also file and sand away the excess material resulting in a nice finished nut. I'll finish this at the set-up stage but thought best to get rid of the bulk of the excess whilst everything was off and strings weren't in the way.


Now onto the machine head install. This was super, super easy thankfully as Nik had purchased the correct sized Genuine Fender locking tuners, which also had the staggered post heights. This will hopefully mean we'll get away with not needing any string trees too. These machine heads had the two locator lugs, of which the neck was already drilled for, always helpful! And secured via a nut on the front face of the headstock. All nice and easy and they look great installed.


Next up is to install the vibrato spring claw in the rear spring cavity, I start off by marking the mounting screw points to prepare for drilling. As many will know, soldering the ground wire to these claws can be tricky, so I find doing this away from the guitar the best method. To allow the solder to flow onto the surface, it doesn't hurt here to lightly sand the surface, and you want to really heat the surface too. So pre-tin, then solder a length of ground wire to the claw which I'll then feed through the body into the main cavity.


I then finish up the last bits of soldering, and finish installation of my loaded pickguard. Really pleased with this loaded guard, very excited to hear it! McNelly 'S-Bar' pickups and a push/pull harness for the additional neck and bridge pickup position all should make for some good fun in this semi-hollow body Strat I think.


I solder the claw ground wire to the harness, and feed the jack socket wires through into the jack cavity. I can now drop the pickguard into the body and pop a couple of screws in to hold it in place.


Wire up the pure tone multi contact jack, mount it to the jack plate and fit that into the body.

With that done I can now plug it in and tap test to ensure the wiring functions as it should. I just lightly tap the pole piece of each pickup and go through the pickup selector positions, push/pull pot and the volume/tone controls to check it all over. With that all happy, it was time to screw down the pickguard.
Now to fit the strap buttons. We opted for some nice modern, slightly wider ones for this, just for a bit of added security really.


Now to mount up the Vega-Trem, Nik's preferred set are a 9-46 Hybrid Slinky, and vega-Trem recommend their low tension springs for this. So I mount those to the bridge, feed through and mount up to the claw. Then we're ready for some strings to bring it up to tension.


Also checking how the neck alignment is too, thankfully the neck pocket on the body has a smidgen of wiggle room which I think is a good thing on a partscaster. Mating parts from different companies can be tricky, different tolerances or specs etc, so for this I don't mind a neck pocket having a little breathing space for adjustments and alignment correction.

Then it was time to get stuck into the setup, adjusting the neck relief via the truss rod, setting the top nut string slot depths, roughing in the string action and saddle radius to suit the fingerboard, bridge spring adjustment so that floats correction and an initial intonation adjustment. I personally find that brand new sets of Ernie Ball strings require a bit more stretching in time than some other brands. So I don't worry about giving the intonation the final nod until it's sat under tension for a day or so. So I will finish that up afterwards.

With the setup roughed in and action where I think it'll be happiest, I then see about adjusting the pickup heights. I am a firm believer in no specifics here. Each guitar and it's owner will be different, so my goal with setting pickup heights is to start with the neck pickup and use my ears! Not the ruler. I adjust and listen to where I think it sounds optimal, nice dynamic response, not too boomy or quiet etc. With that set, I can now work through the middle to the bridge and get a nice balance of volume across the three. As these pickups have individual adjustable pole pieces, I also opt to adjust those to better suit the 9.5" radius too. Seeing as that is fairly curved, and the pole pieces are currently adjusted flat, introducing some radius and consistency across the poles I feel is worthwhile to get the best from each string.

There we have it! This one went great and really enjoyed seeing it come together for Nik. Looking forward to handover day now! Here's some photos of the finished build. If you have a partscaster in the works, and want it playing it's very best, as let's face it these projects don't come cheap anymore so you want the guitar to be it's best! Then final assembly and setup of a partscaster project is a service I offer here, so if that's of interest do please get in touch and I'll love to help.
Here's some more pics of the final build, thanks for reading!
James


The push/pull volume pot gives you the additional pickup position of neck and bridge together for a Telecaster esq middle position tone. Sounds great with the S-Bars! With the push/pull down, it works like a regular 5 way strat.


Have you made good use of some of the free resources here? Wired up your guitar or found useful info here along the way? Perhaps you might consider kindly supporting this free resource for guitarists via 'Buy me a coffee'! Thank you so much!
So here we are! All bits dropped off to me and ready to start the build. We have a really really nice semi hollow Eric Johnson inspired Strat body, a genuine Fender Mexico block inlay modern neck, Fender locking staggered post tuners, a Vega-Trem vibrato unit and of course, my loaded pickguard.
First on my job list was tackling some of the the Vega-Trem install. The body had pilot holes for a traditional/vintage 6 point bridge, but this particular Vega kit was for a modern 2 point style bridge. No problem though and were compatible, just meant I needed to drill for the threaded body inserts before the mount/pivot plate could be attached to the body.
So I lined things up and double checked the location of the mount points of the plate and prepared for drilling. Always a case of check/measure twice(or an extra couple of times on top for good measure) on tasks like this, vital it's right first time really. Using my handy little drilling guide, proceeded to work up through the drill bit sizes until the right hole size was achieved.
Then I popped some vaseline in the drilled hole ready to thread the insert in. I have fitted a Vega-Trem before, and found that these threaded inserts (in particular the notches to allow for a flat head screwdriver) were a smidgen on the brittle side. So took my time here, and the vaseline helps too as you work a thread into the body wood and gradually fit the insert. All went okay though and repeated the process for the second insert...
With the pivot plate fitted, providing me with another marker point and straight edge to line things up with, I proceeded to line up the loaded pickguard and drill for the pickguard mounting screws. With a tiny pilot hole drilled for each position, I removed the pickguard and drilled the correct hole size and finally countersunk. I do this on pickguard screws to reduce risk of lacquer checking around the pickguard holes. I find these pressure points are common starting points of checking, so giving the screw threads a little more breathing room upon install reduces the risk of any chip out and unwanted damage/pressure to the area resulting in finish issues down the line. Looks neater too I think!
Then it was onto the jack mounting plate, similar process here of lining up, drilling, countersink and all ready. I personally mount the jack to the plate when lining up too, I often see on partscaster builds situations where the jack lead when engaged with the jack fouls the jack cavity walls because it is all too close to the edge. Mounting the jack to the plate allows you to move it around and find the perfect position for it where it'll all be clear when fitted.
I then opted to fit the neck, so I could proceed with the fretwork. Having the neck bolted up to the body/neck pocket with the tension applied at the 4 neck bolt screws allows for a more accurate level check. I didn't need to align the neck at this stage, I'll correct that if needed a little later on when I am installing the bridge and can accurately set it. For now, just the tension on the neck bolts is all that is really needed. But I did use the opportunity of first fit of prepping the neck mount holes. The genuine Fender neck came with the 4 screw holes pre drilled, these were the correct size and depth too. But something I do on any new neck install is prep the holes for a safer first fit.
I start of by countersinking each hole a little. I find this helps reduce strain when installing the screws and reduce risk of damage/splits etc.
Then with that done, I apply some vaseline to each hole and install each screw. Ultimately these are self tapping screws so would do this on first install anyway, but in circumstances like these, I find it easier to do it separate to the body so I can monitor the progress and check all is going smoothly. The screw goes in a little easier cutting it's thread into the maple with the vaseline, worth doing first time around I find.
Hopefully you can see in the image, no damage to the neck wood, no strain on the initial edge, and the thread has cut nicely in the hole. This will make the process of installing the neck a little easier and stress free.
Nik supplied a nice new genuine Fender 'F' logo neck plate for this one, a nice touch against the genuine Fender neck I thought.
So onward with the fretwork. Ultimately despite being a genuine Fender replacement neck, these still require some final finishing/fretwork before they're perfect. So I check out how level and consistent the fretboard is with my notched straight edge, and get to work correcting the fret level and radius.
There were a number of high spots so I worked through my leveling file and onto the beam.
I thought this photo captured the amount of leveling/radius correction a new partscaster neck needs, even a nice new Fender item like this one. Even if a company states their replacement/partscaster necks are leveled, crowned and polished I'm usually somewhat dubious if I'm honest. It's best to do it in situ, under tension etc. Most notably you can see the flat top edge on that 21st for example. All no problem though of course and a stage I expect to do on a partscaster build, ultimately this care and attention at this stage really helps play-ability and set-up so fully worth it.
With the level completed, it was onto the crown and polish.
Starting to look really nice! With those polished up, I gave the fretboard some attention as it was particularly dried out. The first application of quality Music Nomad F-One oil literally soaked right in! Couldn't believe it, disappeared before my very eyes haha! So I buffed that and applied some more before finishing up with some nice Monty's 'Instrument Food' wax, which really helped condition the Pao Ferro board and emphasise the nice bold grain lines.
Very pleased with that, looks great! I took the opportunity here to also begin with some of the top nut refinement. This neck came fitted with a new top nut, but also thankfully was oversized meaning I can correctly set the string slot depths upon the set-up myself, and also file and sand away the excess material resulting in a nice finished nut. I'll finish this at the set-up stage but thought best to get rid of the bulk of the excess whilst everything was off and strings weren't in the way.
Now onto the machine head install. This was super, super easy thankfully as Nik had purchased the correct sized Genuine Fender locking tuners, which also had the staggered post heights. This will hopefully mean we'll get away with not needing any string trees too. These machine heads had the two locator lugs, of which the neck was already drilled for, always helpful! And secured via a nut on the front face of the headstock. All nice and easy and they look great installed.
Next up is to install the vibrato spring claw in the rear spring cavity, I start off by marking the mounting screw points to prepare for drilling. As many will know, soldering the ground wire to these claws can be tricky, so I find doing this away from the guitar the best method. To allow the solder to flow onto the surface, it doesn't hurt here to lightly sand the surface, and you want to really heat the surface too. So pre-tin, then solder a length of ground wire to the claw which I'll then feed through the body into the main cavity.
I then finish up the last bits of soldering, and finish installation of my loaded pickguard. Really pleased with this loaded guard, very excited to hear it! McNelly 'S-Bar' pickups and a push/pull harness for the additional neck and bridge pickup position all should make for some good fun in this semi-hollow body Strat I think.
I solder the claw ground wire to the harness, and feed the jack socket wires through into the jack cavity. I can now drop the pickguard into the body and pop a couple of screws in to hold it in place.
Wire up the pure tone multi contact jack, mount it to the jack plate and fit that into the body.
With that done I can now plug it in and tap test to ensure the wiring functions as it should. I just lightly tap the pole piece of each pickup and go through the pickup selector positions, push/pull pot and the volume/tone controls to check it all over. With that all happy, it was time to screw down the pickguard.
Now to fit the strap buttons. We opted for some nice modern, slightly wider ones for this, just for a bit of added security really.
Now to mount up the Vega-Trem, Nik's preferred set are a 9-46 Hybrid Slinky, and vega-Trem recommend their low tension springs for this. So I mount those to the bridge, feed through and mount up to the claw. Then we're ready for some strings to bring it up to tension.
Also checking how the neck alignment is too, thankfully the neck pocket on the body has a smidgen of wiggle room which I think is a good thing on a partscaster. Mating parts from different companies can be tricky, different tolerances or specs etc, so for this I don't mind a neck pocket having a little breathing space for adjustments and alignment correction.
Then it was time to get stuck into the setup, adjusting the neck relief via the truss rod, setting the top nut string slot depths, roughing in the string action and saddle radius to suit the fingerboard, bridge spring adjustment so that floats correction and an initial intonation adjustment. I personally find that brand new sets of Ernie Ball strings require a bit more stretching in time than some other brands. So I don't worry about giving the intonation the final nod until it's sat under tension for a day or so. So I will finish that up afterwards.
With the setup roughed in and action where I think it'll be happiest, I then see about adjusting the pickup heights. I am a firm believer in no specifics here. Each guitar and it's owner will be different, so my goal with setting pickup heights is to start with the neck pickup and use my ears! Not the ruler. I adjust and listen to where I think it sounds optimal, nice dynamic response, not too boomy or quiet etc. With that set, I can now work through the middle to the bridge and get a nice balance of volume across the three. As these pickups have individual adjustable pole pieces, I also opt to adjust those to better suit the 9.5" radius too. Seeing as that is fairly curved, and the pole pieces are currently adjusted flat, introducing some radius and consistency across the poles I feel is worthwhile to get the best from each string.
There we have it! This one went great and really enjoyed seeing it come together for Nik. Looking forward to handover day now! Here's some photos of the finished build. If you have a partscaster in the works, and want it playing it's very best, as let's face it these projects don't come cheap anymore so you want the guitar to be it's best! Then final assembly and setup of a partscaster project is a service I offer here, so if that's of interest do please get in touch and I'll love to help.
Here's some more pics of the final build, thanks for reading!
James
The push/pull volume pot gives you the additional pickup position of neck and bridge together for a Telecaster esq middle position tone. Sounds great with the S-Bars! With the push/pull down, it works like a regular 5 way strat.
Have you made good use of some of the free resources here? Wired up your guitar or found useful info here along the way? Perhaps you might consider kindly supporting this free resource for guitarists via 'Buy me a coffee'! Thank you so much!